Today’s Photo Of The Day is “Luscious Stream” byVincent Fricaud. Location:Dutch Harbor, Unalaska, Alaska.
“Unalaska, nested in the Aleutian Islands chain, offers a strong sense of nature’s powerful will,” says Fricaud. “Battled by strong winds, protected by ragged cliffs, it is once you set foot on the land that you can embrace a little relief and appreciate peaceful hikes such as this one on the Ugadaga Bay Trail. The gale was muting all noise, until the trickle of water drew me away from the path to this canyon. It was quiet and calm, the water was as clear as it gets, and the moss hues made for a perfect shot.”
Photo of the Day is chosen from various OP galleries, including Assignments, Galleries and the OP Contests. Assignments have weekly winners that are featured on the OP website homepage, Facebook, Twitter and Instagram. To get your photos in the running, all you have to do is submit them.
Super-telephotos—Those 500mm or 600mm ƒ/4 bazookas, the 800mm primes that are super, super-tele or the latest superzooms that go from 150-600mm are coveted and loved by wildlife and sports photographers. Their ability to bring what’s far away much closer or make a small subject fill the frame is unattainable unless one of these monsters is used. As with anything that works miracles, there are factors that need to be addressed to get the most out of them. If you already have a super-telephoto and haven’t used it for a while or if you just bought one and want to get the most from it, below are ways I’ve learned to use a super-tele to attain the best possible images.
Before getting into the ways to conquer super-tele nuances, I want to share the virtues of what these lenses can do to bring your photography to the next level. The most obvious benefit is their capability to bring far away subjects closer and to make small subjects bigger in the frame. What’s not so well known is they compress distant objects, which makes them appear closer. Receding mountain layers can be stacked to have them seem nearer than they are—it’s known as compression. Another bonus is they provide very narrow depth of field. As a result, backgrounds can be more easily thrown out of focus. This allows a subject to stand out from the background. They also have a very narrow angle of view. This can help your compositions by eliminating distractions that would otherwise appear on the edges of the frame if a shorter lens was used.
Magnify the Subject = Magnify the Mistakes: Hand in hand with subject magnification comes magnification of poor handling technique. With a wide-angle lens, a tiny bit of camera movement can be tolerated. If that same amount of movement is created when you use a 200mm lens, the image will be soft. Now step up to a 500, 600 or 800 and it’s MUCH more pronounced. It’s essential the camera/lens combination is mounted to a solid tripod and head. For my 600mm, I have a dedicated sturdy carbon-fiber tripod. Attached to it is a gimbal head. Before I press the shutter, I tighten all knobs that control movement, and I don’t “jab” it. A soft gentle push is recommended. To make sure your tripod/head combination is adequate, mount the lens to the gimbal and tap the leg of the tripod with your index finger while looking through the viewfinder. If you see lots of movement, it’s time to upgrade the rig. A rule of thumb is to use a shutter speed that is 1 over the reciprocal of the lens’ focal length. For instance, if you have a 500mm, try to use a shutter no lower than 1/500. This rule is primarily in place for handholding, but I like to stick with it when I break out the big lens. I have used shutter speeds as low as 1/60, but I make sure everything is totally locked down and I also use a cable release or initiate the self-timer on the camera. If you have to resort to slower shutter speeds, be extremely aware of an animal’s movement. Any motion whatsoever when a slow shutter is used translates to a soft subject due to its movement.
Close Focus Limitations: Long lenses aren't known for their close focus capability. As a matter of fact, they don’t focus close. To overcome this deficiency, I bring extension tubes into the field. The increased distance they create between the rear element and the camera body allows it to focus closer. The drawback is the lens loses its capability to focus to infinity, so if a gorgeous animal pops up on the horizon, the tube must be removed in order to make the image. Try to reserve the incorporation of an extension tube for times when you know the only subjects you photograph will be closer than the default close focus distance. There is also a loss of light associated with an extension tube, so be aware of the magnitude of ambient light.
Acquiring the Subject: Given the narrow angle of view, especially of a 600 or 800, if a small subject is close and it’s moving, it’s often difficult to find it in the viewfinder. A great trick I use is analogous to the sighting mechanism of a rifle. I place the lockdown screw on my lens hood in line with the hot-shoe on the camera. When I look just above the hot-shoe, I see the screw for the hood. If it’s not perfectly in line, I loosen the screw and “resight” the setup. When it comes time to find a subject, line up the hot-shoe with the lens hood screw and you’ll much more easily acquire it.
Add More Telephoto Capability: Here’s an all too commonly found scenario: You purchased a 500mm and wished you got the 600. You bought a 600 and you now kick yourself because you could have had the 800. You acquired an 800 and now wish the manufacturers would come out with a 1200—you get the idea! Regardless of the focal length you purchased, you develop lens envy for a more powerful tele. The teleconverter to the rescue. The most common is a 1.4. It magnifies the effective focal length by 1.4 times so a 600mm becomes an 840mm. One full stop of light is lost, but the quality of the lens is so good, the sharpness factor isn't impacted. Therefore, it’s a great trade-off. If you do incorporate the use of a teleconverter, it’s essential you adhere to careful camera handling techniques to ensure you get as sharp an image as possible.
Image Stabilization: Should you leave VR or IS on or turn it off when the camera is mounted to a tripod? The answer to this question can be found in your user’s manual for the lens. Some have a tripod VR or IS switch and some don’t. Many manufacturers recommend turning it off if the lens is on a tripod and locked down. If the gimbal is set up to move vertically and horizontally, reference your manual for the recommended setting. Gyros try to initiate stabilization, and if no stabilization is necessary, the mechanism gets confused. The rear moving element doesn’t know what to do, which may result in a soft image.
Counter the Movement: To help offset camera movement as a result of pressing the shutter, long lens photographers stabilize the lens by supporting the underside of the lens hood with their left hand as they simultaneously press the shutter. Every press of the shutter produces movement at the far end of the lens. The left arm support counters this movement and results in a higher keeper rate. It’s also essential you don’t jab the shutter when it’s pressed. It’s easy to be a jabber because you get caught up in the moment and jab the shutter as the action unfolds. If I just described you, adopt the above technique.
In this Outdoor Photographer exclusive video sponsored by our friends at Tamron (watch below), contributing technical editor David Schloss and DL Byron head to California’s Joshua Tree National Park for several days of landscape shooting.
Joshua Tree is a remarkable place, with the park crossing over the junction of two distinct desert ecologies, the Mojave and Sonoran. Armed with Tamron’s 18-400mm F/3.5-6.3 Di II VC HLD, the duo captured sunsets, sunrises and some incredibly curious wildlife.
In part two of this series, Schloss returns to a location he scouted the evening prior for a sunrise shoot, with an added bonus of a full moon setting over the scene. Watch part one of this video series here.
Dealing with copious numbers of image files is a necessity for us photographers, and keeping these files safe is of utmost importance. In this episode of the reCOMPOSE podcast Andy and Juan discuss their strategies for ensuring the safety of our precious images. We discuss dealing with images while traveling, what to do when you return home and how to keep them safe once we have ingested them into our master catalogs.
Mount Evans is located in central Colorado at the top of the Mount Evans Scenic Byway. The byway is about 32 miles west of Denver off Interstate 70 at exit 240. At the exit, turn left (south) on Colorado Highway 103, then drive about 14 miles to the fee station. After that, pass Echo Lake and turn right on Colorado Highway 5 (Mt. Evans Road).
Driving to Mount Evans entails narrow, winding shelf roads with sheer vertical drops to one side. There are also sections of road that are deeply buckled by freezing and thawing. Though you don’t need a rugged vehicle to drive here, it’s advisable to drive slow, let other vehicles pass at pinch points and check the weather before going to avoid freezing precipitation.
Weather
With the mountain over 14,000 feet, you should dress for the worst. Summer afternoons commonly bring brilliant sunny skies one moment, followed by snow or frigid downpours the next. It often drops below freezing at dusk. Wind is usually present and strong. At this altitude, be prepared for lightheadedness, difficulty breathing with even light walking and symptoms of altitude sickness.
Photo Experience At Mount Evans
The drive up to Mount Evans is a continuous spectacle, with opportunities for both landscape and wildlife photography. Along the way, you’re likely to encounter bighorn sheep, marmot, coyote and wildflower meadows. A super-telephoto lens is handy for the fleeting coyote or golden eagle soaring overhead, but many animals are accustomed to vehicles and can be photographed up close. At the top of Mount Evans, herds of mountain goats that are habituated to humans roam the crags. They often come close enough to capture “animal in its environment” shots without the need for a telephoto lens. Because of the vast range of changing subjects, I often use a 28-300mm lens. The mountain goats are constantly on the move, so instead of using a tripod, I handhold my camera with image stabilization turned on, a wide aperture and an ISO around 400.
At the top of Mount Evans, you’ll be peering down over rows of jagged mountains. Fantastic for landscape photography, I also love to shoot time-lapse sequences here. At this level, you’re close to the clouds where their movement is fast and volatile. Even a short time-lapse can capture clouds smashing against the mountains and heaving like a stormy sea. Make sure to know how your camera’s intervalometer settings work before “go time”, and bring your heaviest tripod to contend with the violent wind. Also, bring a polarizer and a (variable) neutral-density filter to capture cloud movement in still shots. As for lens selection, you’ll want the option to take wide-angle shots, but in this environment you’ll more often need to zoom in to individual peaks across valleys, so bring a tele zoom as well.
The Mount Evans area can be photographed at any time of day. There are east- and west-facing subjects for golden-hour photography and low-hanging clouds for dramatic mid-day shooting, and wildlife is usually present along the road all day.
Best Times
The Mount Evans Scenic Byway is typically open from the Friday of Memorial Day weekend through the first weekend in October. Late June is among the best times to visit because mountain goat nannies have newborn kids in tow.
Songbird photography is difficult on many levels. Songbirds fly fast, they often move without providing signals, they're small so they require you get close or use a long lens and many are seasonal. Here’s where backyard bird photography can be a huge benefit if it’s your desire to capture good shots of them. It doesn't take a lot of effort to attract birds to your backyard and the overall expense is low, especially if you weigh it against going to far away locations where specific species have grown tolerant of people. The keys to setting up your yard to make it an attractive spot for birds include providing a source of water, putting up perches so the birds have a place to land, providing an accepted form of food as in bird seed or suet, installing nesting boxes and, depending on how skittish a species is, setting up a blind.
Water: I have a bird bath that I constantly keep filled with water. It’s important to keep it full so the birds learn they can rely upon it. Place a perch or two close to it so each species has a place to land and inspect the area for safety before they choose to make themselves vulnerable when they drink. The perch also creates a natural location for the bird to alight, which nets a better photograph.
Perches: Along the back side of my yard, I have a low fence. Attached to it, I place mulleins, old sticks, small twigs and a few thick branches. Each species prefers a different size perch upon which to land. Having ones of various diameters will make each comfortable on where to settle. Try to mount these perches fairly high off the ground so the birds feel less vulnerable. Also, be extremely cognizant where they're placed. Be sure the backgrounds are far away so you limit depth of field. A totally out-of-focus background allows the bird to stand out. A background that has distractions competes for attention and the resulting image falls short.
Food Source: There will always be in-depth debate regarding the use of food to attract wildlife. A purist would never think of using food of any type while those on the other end of the spectrum use means that endanger the animal being photographed.
Case in point is the use of live mice to attract owls. This is unacceptable for me. I do admit to using bird seed and suet to feed and photograph birds as these food items are deemed acceptable by many professional bird organizations. Setting aside the ethics issue, use approved seed and suet in addition to putting the seed in a good feeder. Place the food close to the perches so the birds can first land on the sticks, examine the environment for safety and then go in to feed.
Nesting Boxes: I do have a bluebird nesting box along my side fence. It was wonderful to watch the male and female first go through their courting ritual and progress to the point where they created a brood. The best part was when the young grew large so both parents had to constantly hunt for bugs. In the photo of the female bluebird with a beetle below, she landed on the fence post right next to the box, scanned the area and flew to bring the babies the food. Placing the hand of man in a wildlife shot is often acceptable if it’s “natural” for a bird to land there.
The beauty of backyard bird photography is you can make photos any time of the year. Spring and summer often prove to be the best, but with fresh snow and great sunrise or sunset light, you can capture amazing photographs. Give it a whirl!
Congratulations to Tom Elenbaas for winning the recent Travel Photography Assignment with the image, “Hamnøy Rorbu.”
"Two years ago, I had the opportunity to spend a week in Norway’s Lofoten Islands," explains Elenbaas. "One of the highlights of the trip was staying in Hamnøy, the oldest fishing village in the Lofoten archipelago. Sitting perched on stilts above the crashing waves, the old fishing huts, the Rorbu, have all been converted to lodging. While they now possess modern amenities, staying there was an opportunity to get a glimpse of what life would have been like for Norway’s cod fisherman in the not too distant past.
"One of the iconic shots nearly everyone who visits the Lofoten Islands takes, and for good reason, is of the red Rorbu of Hamnøy with the mountain Festhelltinden as a backdrop. A bridge crosses the bay just outside the village and is the perfect place to set up. For this shot, I used a slow shutter speed to capture the movement of the waves as they cascaded across the rocks at the base of the village."
Sony A7Rii, Sony FE 24-240 @24mm, ISO 100, f/22, 1.6 sec.
]]>A long-exposure motion blur image of a surfer riding a perfect tube at Banzai Pipeline on the north shore of Oahu, Hawaii. To get this image, I panned the camera as smoothly as possible as the surfer flowed across the wave face. Nikon D700, AF-S NIKKOR 200-400mm f/4G ED VR II @ 400mm, Gitzo tripod, Wimberley gimbal head. Exposure: 1/25 sec., ƒ/4, ISO 200.
Surfing is one of the most exhilarating adventure sports, bar none. The athleticism and skill on display by world-class surfers pushing the boundaries of what is humanly possible on huge waves is a visual feast for any photographer. Because of this, there has been a swell of interest in surf photography. From exploding waves to surfers launching down huge wave faces, the number of photographers interested in surf photography has grown exponentially. In this article, we’ll discuss the basic techniques and what’s involved when heading out to shoot surfing.
There are typically three ways to photograph surfing. First, you can shoot from the beach or a nearby pier. Second, you can shoot from a boat or a jet ski. Both of these first two options use a telephoto lens to shoot from a distance. Third, you can get in the water and shoot from inside the wave or under it. In each scenario, there are different considerations in regard to the equipment required, composing the image, focusing the camera and achieving an accurate exposure.
Shooting From The Beach Or A Pier
Working from the beach or a nearby pier is the easiest option when it comes to shooting surfing, and it normally requires a big lens, usually a 600mm lens or the equivalent. Unless you are Arnold Schwarzenegger, you’ll also need a sturdy tripod and ballhead or a gimbal head that can deal with such a massive lens.
In the old days, getting these long focal lengths meant using a 500mm f/4 or a 600mm f/4 lens. Nowadays, there are quite a few smaller and much less expensive options like the current crop of 150-600mm zoom lenses. One critical factor to think about when choosing a lens is that autofocus speed and accuracy will be tested while shooting surfing. In my experience, anything but the best telephoto lenses will miss autofocus more often than I would like, which is why I always rent a top-end 400mm f/2.8, 500mm f/4 or 600mm f/4 lens when shooting from the beach. I highly recommend draping a towel over your lens and camera to keep them from getting worked over by the corrosive ocean spray.
Mark Healey dropping in on a big wave at the 2009/2010 Quiksilver In Memory of Eddie Aikau big wave surfing competition in Waimea Bay, Hawaii. On these 40- to 50-foot waves, the surfers would free fall for 10 or 15 feet before they even hit the wave face, which made for amazing images. Shot from the beach. Nikon D700, AF-S NIKKOR 500mm f/4E FL ED VR, Gitzo tripod, Wimberley gimbal head. Exposure: 1/2500 sec., ƒ/7.1, ISO 400.
In addition to a long lens, a camera that can shoot at a fast frame rate will be critical to catch the split-second action. I recommend a camera that can shoot at eight frames per second or faster. The faster the frame rate, the higher the chance of capturing the height of the action. The flip side of this, though, is that a faster camera will produce more images to go through after the fact. In general, if you shoot a full day, you can expect to have three to four thousand images or more to edit. The reality is that if you are not capturing thousands of images, then you are missing a lot of would-be-amazing surf action images.
Another issue is staying ready to shoot at any moment. On the beach there are a lot of distractions, and after a few hours it is easy to fall into a lull. Because the surfers are catching waves at will, you need to stay sharp and pay close attention for that split second when they go for a wave. Any slip in your concentration could cost you the best shot of the day. And with such a big lens, you have to be looking through the viewfinder and ready to shoot before the action starts, or you will have already missed the shot.
To get sharp images, I set the autofocus to continuous mode so the camera will continually adjust the focus as the surfer moves toward me. To compose, I choose a focus point where I want the surfer to be in my frame and then put that point on the surfer, being mindful of the shape and size of the wave. In general, you want to see the entire wave as it curls up above the surfer—especially if it is a big wave. Nikon’s 3D Focus Tracking, which is what I typically use these days, frees you up from having to concentrate on keeping the AF point over the subject and really helps when composing. Note that I also shoot at shutter speeds of 1/2000 sec. or faster to freeze the action.
Michael Ho trying to stay ahead of a big wave at the 2009/2010 Quiksilver In Memory of Eddie Aikau big wave surfing competition in Waimea Bay, Hawaii. This image was shot from the backyard of a house that is right on the point where the wave breaks. Nikon D700, AF-S NIKKOR 500mm f/4E FL ED VR, Gitzo tripod, Wimberley gimbal head. Exposure: 1/3200 sec., ƒ/7.1, ISO 400.
To find different angles, it is easy enough to walk up and down the beach, but if you get too far away you’ll need a 1.4x teleconverter to help pull in the distant surfer. How you position yourself relative to the wave depends on the surf break and what you are going for. If you position yourself perpendicular to the wave, then you’ll be able to shoot both sides of the wave if there is a left and right break or surfers are dropping in “off the wall.” If you want to see the surfer in the tube, then you’ll have to walk down the beach for an angle that lets you see into the tube. If there is a nearby pier or jetty, either can offer a great way to line up parallel with the wave, which is an otherwise difficult proposition.
No matter where you shoot from, the key thing to keep in mind when composing the image is that you always want more room in front of the surfer than behind them. This is a typical rule of thumb when photographing any sport but especially so when shooting surfing. For surfing, this becomes tricky when the surfers cut back on the wave and change their body position. When the surfer cuts back on the wave, quickly recomposing so that there is more room behind them is key for the composition. When in doubt, I recommend shooting more loosely with a wider lens (maybe a 400mm instead of 600mm) and then cropping after the fact.
Surf Photography From A Boat Or Jet Ski
Photographing surfing from a boat or the back of a jet ski offers an incredible vantage point. Working from a boat or a jet ski isn’t much different than shooting from the shore, but it does add some complications. You have to deal with the motion of the sea, getting into and maintaining your position, and protecting your camera.
This image was shot from a boat in Tahiti at Teahupo’o, which is one of the world’s most famous waves. As can be seen here, the perspective from the boat allows us to shoot straight into the wave, giving a totally different vantage point than is possible when shooting from the beach. Nikon D700, AF-S NIKKOR 70-200mm f/2.8G ED VR II @ 180mm. Exposure: 1/3200 sec., ƒ/5.6, ISO 400.
To deal with the motion of the waves, it’s easy enough to shoot with a high shutter speed and opt for lenses with built-in image stabilization. To maintain your position, it is a good idea to have someone else driving the boat or jet ski. On a boat, you probably won’t need anything to protect your camera, but when working from a jet ski, I recommend using a surf housing and a lens port that works with a 70-200mm zoom lens.
On a jet ski, a 70-200mm zoom will usually suffice since you are generally closer to the wave than when on a boat. If you are on a boat, you probably need a bit more reach—either a 300mm or a 100-400mm zoom.
One last note: If you are on a jet ski in big surf, it is highly recommended that you are ready to swim at any moment. If you are in this situation, the odds are high that you are a surfer, but for the uninitiated, having your surf fins on and your camera in a surf housing would be the basic safety precautions. At any moment while sitting on the back of a jet ski, especially when going over large waves, you could get bucked off and be forced to swim.
One of the advantages of shooting from a boat is that you are higher off the water and can get these wild vantage points (like in this image) where you are looking down into the barrel of the wave. This is another image shot in Tahiti at Teahupo’o. Nikon D700, AF-S NIKKOR 70-200mm f/2.8G ED VR II with a 1.4x teleconverter @ 270mm. Exposure: 1/1250 sec., ƒ/5.6, ISO 400.
Shooting In The Water
One of the biggest decisions any surfing photographer has to make when they get to the location is whether to shoot from the beach or a boat, or to get into the water. In reality, the decision might be made for you depending on the size of the waves and your swimming skills. Getting into the water requires an entirely different skill set than shooting from the beach. It certainly helps if you are a surfer, so you can judge when and where the surfers will be as they come down or across the wave. Because you will typically have to swim a fair distance from the beach in sizable waves, it is a critical that you are a very strong swimmer and in excellent shape. There is some serious technique involved to get yourself into a wave safely and snapping the shutter as the surfer comes past you.
Surfing photographers take a pounding to get images while treading water at close proximity to surfers and know just when they need to pull through the back of the wave to stay out of trouble. It may seem obvious, but I’d recommend you take it easy and improve your skills in moderately sized waves if you are just starting to shoot surfing from the water. I’d also highly recommend wearing a hard-shell surf helmet and a pair of bodysurfing fins. The helmet will save your life if you misjudge the distance and speed of the surfer and get whacked in the head by a surf fin. The helmet will also protect your head if you smack the reef, which is a much bigger issue in many locations than getting hit by a surfboard.
For this image, I was trying to get an over/under surf image. The waves this day at Sunset Beach on the north shore of Oahu weren’t that big, which is what allowed me to position myself right in front of the wave. The whole point of this image is to show the razor sharp reef just 6 feet below the surface of the water. By using a fisheye lens and a fisheye port on my surf housing, I was able to catch both the surfer above the water and the reef below. Nikon D4, AF Fisheye-Nikkor 16mm f/2.8D, CMT carbon fiber surf housing with a fisheye port. Exposure: 1/3200 sec., ƒ/5.6, ISO 800.
When shooting in the water, a surf water housing is required. Surf housings are waterproof down to around 35 feet or so. Because you will have to swim through oncoming waves, the lighter the surf housing, the better. There are a number of surf housing manufacturers, including AquaTech, SPL, CMT and Liquid Eye, among others. A pistol grip is required to hold the camera in position, and a leash will keep you from losing the camera in heavy surf. Lastly, be sure to get a lens port for a fisheye and a 70-200mm zoom lens if you want to shoot from a jet ski or outside the wave. Because each housing is specific to the camera model, choose your housing wisely and pay close attention when inserting your camera into the housing to avoid having your camera flooded, which is an extremely expensive nightmare. I would also highly recommend using larger 64GB or 128GB memory cards so that you don’t run out of memory space while out in the water.
In general, the go-to lens for surf photography while in the water is a fisheye lens. When using a fisheye, you’ll want to turn off the autofocus and use a hyperfocal distance method to make sure everything you point the camera at is in focus. To make sure that your foreground (i.e., the wave) is still sharp, you’ll want to modify your hyperfocal focus so that you are just off the infinity mark on your lens. The odds are good that you’ll be close enough so that the surfer is only about 10 to 20 feet away, not at infinity, so this method works quite well. A good trick is to tape the focus ring on your lens (with gaffer’s tape) before you put it in the surf housing, so that when you are getting rolled around like a cat in a washing machine, the hyperfocal distance focus setting doesn’t shift inside the housing.
When using a surf housing, you’ll have to set most of your camera’s settings before you get into the water, particularly the ISO. Because it is sometimes darker inside the wave, I would suggest setting the camera to ISO 400 (or use Auto ISO) and using a small aperture like ƒ/8 or ƒ/11 to get as much depth of field as possible. When working with a fisheye lens, I shoot for ƒ/11 if I can get it. I typically have my camera in Aperture priority mode, so that the aperture stays fixed and I use an appropriate ISO setting to make sure the shutter speed is fast enough to stop the motion. Some cameras allow for setting a minimum shutter speed when using Auto ISO; if yours has that feature, I would highly recommend using it.
Diving under the surfers offers a unique perspective. In this image, the surfer is waiting for a wave, and I dove under her to show what it looks like from beneath the surface. Note that this image was shot on the north shore of Oahu in Hawaii, so the water there is very clear, which is key to getting an image like this. Nikon D4, AF Fisheye-Nikkor 16mm f/2.8D, CMT carbon fiber surf housing with a fisheye port. Exposure: 1/3200 sec., ƒ/5.6, ISO 800.
One of the recent trends in surf photography is a pulled-back look using a 50mm lens and moving farther away from the action to show the entire wave. Another alternative is to shoot with a 70-200mm lens while sitting outside the wave. When using anything other than a fisheye, I recommend that you engage the autofocus while shooting in the water. One of the big issues when shooting in the water is that there might be quite a few other photographers trying to shoot with fisheye lenses—especially at the famous surf breaks like Pipeline and elsewhere. Good communication, both with the other photographers and with the surfers is key for everyone’s safety.
Lastly, if you are looking to get epic surf images, I recommend traveling to well-known surf breaks. Hawaii, Tahiti, Indonesia, Fiji, Australia, California and Mexico all have some of the world’s top surf breaks. All of the images included with this article were shot in either Hawaii or Tahiti. Showing up during a big swell at a famous surf break makes a huge difference—and more than likely the best surfers in the world will rally to those locations as well.
]]>During the 2008 race, my pilot and I were in the air, flying from one checkpoint to another, when I spotted this lake, which was wind-blown and free of most of the snow that would normally be covering it. Great lines, and I hoped for a team. Sure enough, one was coming. We circled several times and attempted to time the 90 mph airplane with the 8 mph dog team to be over the top of the team. We succeeded.
Iditarod means “a far distance place” in the Alaska Native Ingalik Indian language. Halditrod was the traditional name of the river in which, in 1908, gold was discovered in a nearby tributary, and people flocked to the area and other gold-rich parts of Alaska.
With winter in most parts of Alaska lasting six months, dog teams were the only reliable mode of transportation at the time and were heavily relied upon. People traveled from village to village and supplies, including the U.S. mail, were hauled by dog teams and their drivers over various trails. The longest and most well-connected trail was the 938-mile Iditarod Trail from Seward, Alaska, to Nome.
After the airplane and snowmobile came to Alaska, the dog teams were slowly put out of business. Villages that used to have hundreds of sled dogs now had nearly none. Joe Redington Sr. was a man who loved dogs and dog mushing, as he used the dog team while homesteading in Alaska in 1948 as well as in his work for the U.S. Army recovering crashed airplanes. Seeing the decline of the dog team in Alaskan villages, Redington yearned to revitalize dog mushing.
After helping to organize a short 25-mile sled dog race in 1967, Redington was convinced that a long-distance race, over the historic Iditarod Trail, would be the way to bring back the sled dog. On the first Saturday in March of 1973, 35 mushers left Anchorage on the inaugural 1,049-mile Iditarod Trail Sled Dog Race to Nome.
Iditarod Today
The Iditarod race now attracts an average of 75 mushers each year and covers the same course (Anchorage to Nome) as the first race, though every other year the trail is alternated, midway, between a northern and southern route. Redington succeeded in bringing back the sled dog. The trail is 99 percent in the wilderness and runs through forests, over frozen tundra, down and across many rivers and creeks, crosses two mountain ranges and passes over hundreds of miles of sea ice.
Race rules stipulate mushers begin with 12 to 16 dogs. Dogs may be dropped along the way, but no new ones may be added, and the musher must finish with at least five dogs. Mushers may have no outside assistance at any time during the race and must check in at each of the 22 checkpoints to have their dogs examined by a team of veterinarians. Mushers send supplies and dog food to each of the checkpoints prior to the race start. The winner will finish the thousand miles in eight days, and the last musher, some five or so days later.
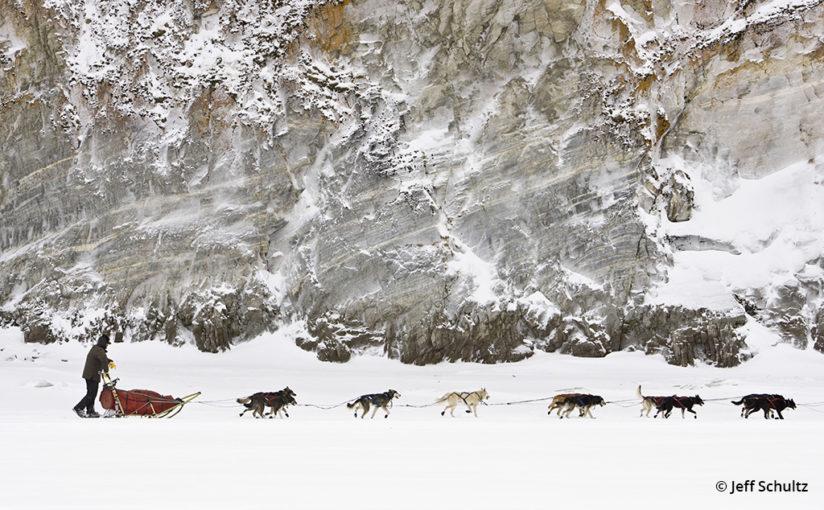
Four-time Iditarod champion Lance Mackey checks the time on his watch shortly after leaving the checkpoint at the village of Ruby. Mackey is shown here on the Yukon River near some very large cliffs. Using a telephoto lens, the background and dog team were compressed.
If you’ve ever wondered just how tough it is to be an Iditarod musher, consider this: More people have summited Mt. Everest than have completed the Iditarod.
How I Became Iditarod’s Photographer
In 1980, at age 20, I was shooting weddings and portraits in Anchorage. I had never heard about the Iditarod, until one day when I was fortunate to meet Redington and asked him if I could make his portrait. Joe was a most avid photographer, and on that first day meeting him I was simply fascinated by his life and the Iditarod as he showed me hundreds of Kodachrome images of his early homesteading and dog mushing adventures.
Joe wanted to get everyone who he could involved in the Iditarod, and after the portrait shoot he asked me if I wanted to take one of his dog teams to Nome. I politely declined, and he shot back with, “Well, then come take pictures for us.” And so I did.
For the 1981 race, I found a private pilot who was willing to fly me along the trail if I paid for the gas and oil for the plane. My $500 budget only got me as far as halfway through the race. I processed the images and donated over a hundred black-and-white prints to the non-profit Race Committee.
A couple months later, they called and said, “If you want to donate your photos again next year, we’ll pay for your gas and oil and food, and you can sleep with the other volunteers and be one of our official photographers.” I agreed, and that’s the premise that we still work under today. I’m one of the thousands of volunteers who help put on the race each year.
The first couple years I photographed the race, I had absolutely no idea of what I was doing or how to do it. I just went out and shot, waited around and shot some more when something happened. Or I missed the shot. Or I heard from a musher, “You should have been where I was a couple hours ago.” I tried, and I learned.
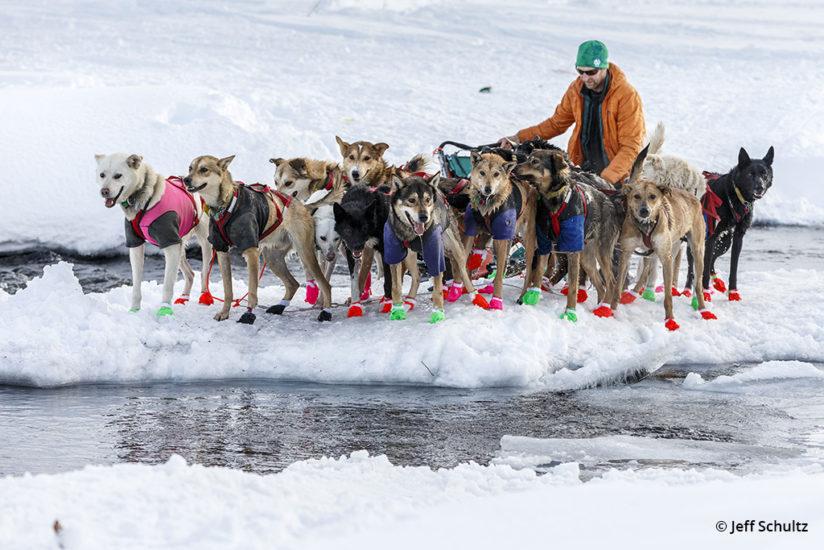
As I flew between checkpoints during the 2016 race, we spotted open water from a creek. During one of those out-of-the-ordinary trail conditions, we landed and waited for a team. Most dogs don’t like to cross open water because they don’t know how deep it is. The musher convinced the dogs to cross the first stretch, and then they balked again at the next. This is one of those unique images that has me coming back each year.
Then, after having traveled the trail a few times, I began to understand the players better and really got to see the terrain, the various checkpoints and the like. I started to devise actual “plans” ahead of time regarding where I might want to be to get more of the unique shots. But planning out a 10-day photo shoot over a 1,000-mile course of wilderness, with no guarantee of flyable weather and not knowing whether or not I’d be able to actually get to some of the places I saw previously, made it really a logistical nightmare. My plans were more often thwarted than successful.
Now, after 36 consecutive years of covering the race, and the digital age upon us, logistics are still mostly unpredictable but a bit easier, and I am certainly more relaxed about it.
Photographing The Iditarod Adventure
My main mode of transportation is the Alaska bush plane. The race committee dedicates a pilot of my choosing to me. We fly in a 4-person Cessna 185 airplane. Over the 36 years, I’ve had three main pilots, interspersed with years where I had to use several pilots for the trip. After a life-and-death plane crash in 1992 while covering the race, I’m looking for a very experienced and safe pilot as well as one who can fly the plane in a way that allows me to make good aerial photos. Not all pilots can do all three well.
With no roads along the trail, we typically fly from checkpoint to checkpoint. While flying, I’m always on the lookout for something unique about the trail that would tell the story of this year’s race, something different than a snowy path to Nome. It might be a challenging area for the team to negotiate or a treacherous-looking section, or one with great beauty or just somehow photographically different from what I’ve shot in the past. When I spot one, there is hopefully a dog team nearby.
By the second day of the race, the 75 or so dog teams are spread out over hundreds of miles. It would not be unusual for me to wait hours for a team to show up at any particular point. So it’s a real advantage to know just where the mushers are. Depending on the scene I find, and where the dog team is on the trail, we may land the plane nearby on a river, lake or open area for a ground-based image, or make a few passes of the team to make an aerial shot. As we approach a checkpoint, I’m even more interested in finding that unique perspective on the area from which to shoot, and also looking if a team will be arriving soon.
Once we land at a checkpoint, if I noticed a good scene or a team on the way in, I will usually borrow or rent a snowmachine (the Alaskan word for snowmobile) from a village resident and drive on the race course a few miles or more to wait at that location for a team to come by.
Fabrizio Lovati travels on the trail just prior to the Finger Lake checkpoint during the 2008 Iditarod. After photographing the race for so many years, I am constantly looking for a new angle. Such was the case here. I hired a guide to take me by snowmobile and, with the musher’s permission, we “paced” the team for a mile or so with me sitting facing backward and shooting the team as it traveled.
When I find an interesting part of the trail, I attempt to make the most of it and the dog team that is heading toward me. I may not get another shot at a team in that same area. In doing so, I’ll look for a vantage point that allows me both a telephoto shot, as well as a wide-angle view, and pre-visualize the shots. Sometimes that does not work and I only get one view of the team.
With the race course stretched over 1,000 miles, there is certainly diversity in the terrain, but at the same time, there is a lot of the same thing. Miles and miles of nothing. But even that can be beautiful with the right conditions. Shooting the same race, over the same course, for so many years, it’s sometimes difficult to find inspiration and a new perspective. At times it’s hard for me to get motivated to shoot the same thing in the same place as previous years.
There is one section of the trail that suits my taste best and that I can photograph over and over again. That is the 65 miles of trail from the Finger Lake Checkpoint to the Rainy Pass checkpoint and up and over the Alaska Range, to the Rohn Checkpoint. I love this area because I so enjoy juxtaposing the small dog team against the massive looming mountains that encompass it. This is an expanse where I typically spend two or more full days. Most years I will hire a local guide to take me by snowmachine the 35 miles from the Rainy Pass checkpoint, up at over the 3,022-foot summit of Rainy Pass to Rohn. We may even spend the night in a small hunting cabin near the summit.
The checkpoints of the Iditarod range from primitive tent-camps set up just for the race by the Trail Committee, to a few old cabins in a ghost town or, most common, an Alaska Native village of 150-250 people. During the race, these villages are a buzz of activity from the scores of race volunteers (trail breakers, veterinarians, checkers and communication personnel) flown in for the race and the locals who also volunteer. Iditarod is known as the Mardi Gras of the North.
At the checkpoints, I edit and caption the images, then turn them over to my volunteer assistant, who processes the images and uploads them to the Iditarod website and social media. While that is taking place, I am out shooting more at the checkpoint.
Iditarod Gear & Preparations
The weather in Alaska of is oftentimes unpredictable, and in the winter it can be most unforgiving and brutal. During my years chronicling the race I’ve seen 40 degrees above zero and rain, 60 degrees below zero and clear, winds to 60 mph, and everything in between. A typical race will have temperatures from 20 above zero to 25 or 30 below zero for a few days. There’s been years where there was not a cloud in the sky for the entire race, and other years where snow and wind wreak havoc on the flying transportation, grounding the volunteer Iditarod Air Force for days. The reliable dog teams still move easily—it’s just the people following the race in planes who are stuck.
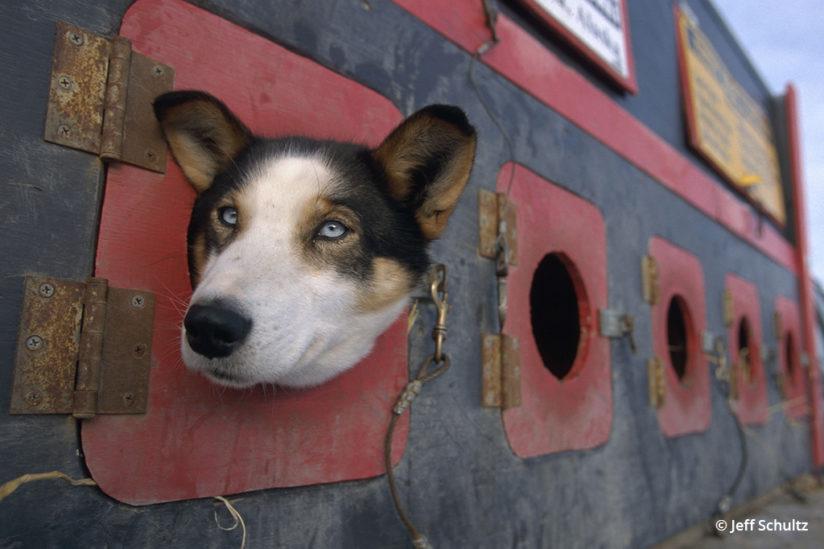
At the race start, mushers transport their dogs in these custom-made dog boxes on the back of pickup trucks. Some dog boxes allow the dog to stick their head out, which oftentimes makes for a compelling and cute image, like this photo of musher Tim Osmar’s dog Bonnie.
Because we’re in a small plane and weight is an issue, I pack as lightly and compactly as I can while still having enough gear to be comfortable outdoors for hours at a time at those sub-zero temps. I carry only one duffle bag of spare clothes, adding layers to what I already have on as the temps drop.
For me, if my feet are warm, then for the most part, I’m warm. So I wear one pair of really sturdy boots on the trail, a pair of Cabela’s Trans-Alaska boots. They have 3 inches of material between the ground and my foot, plus good insulation. I’ve never had cold feet in them. Of course, I must be able to use my hands to operate the cameras even at those cold temperatures. My preference is to wear gloves made of wind-stopping material for shooting, and if necessary put them inside large mittens when not.
My everyday assignment and stock photo cameras are Canon EOS 5D Mark III and EOS 7D Mark II bodies. But for the Iditarod, using Canon’s Professional Service, I borrow two EOS-1D X Mark II bodies. These bodies are perfect for the Iditarod for four main reasons: the low-noise, high-ISO capabilities are fantastic; the 12 fps motor drive works wonderfully with the fast-moving dogs; the high-power NiCad batteries last a long time in the cold; and, my very most favorite feature of the 1D X Mark II, the ability to embed a sound recording in the image file. This feature is unbelievably useful, allowing me to speak the caption, including spelling of a person’s name, and have this saved with the image. That feature alone is worth using this camera—writing peoples’ names onto paper in sub-zero temps is hard enough, but then trying to match the images and caption later is a time waster.
My lens selection includes the Canon EF 16-35mm f/4L IS USM, EF 24-105mm f/4L IS USM, EF 70-200mm f/2.8L IS USM and the EF 100-400mm f/4.5-5.6L IS USM. I am always shooting with two bodies: one with a wide-angle lens and the other with a telephoto.
Planning An Iditarod Trip
For those who would want to experience the adventure of Alaska’s Iditarod and capture it with images, there are a number of options to consider. As mentioned, the race course has no roads connecting the checkpoints, making air travel a necessity.
For the first-time visitor, photographing in Anchorage during the Saturday ceremonial start, again at Willow on Sunday for the restart, and then some eight days later at the finish in Nome is by far the easier and least-expensive way to make images of a lot of dog teams over a short period of time. It’s easy enough to fly a commercial airline to these places, find the race route, rent a car, and stop along the trail to photograph. One does not need any special permission or experience to watch and photograph the race.
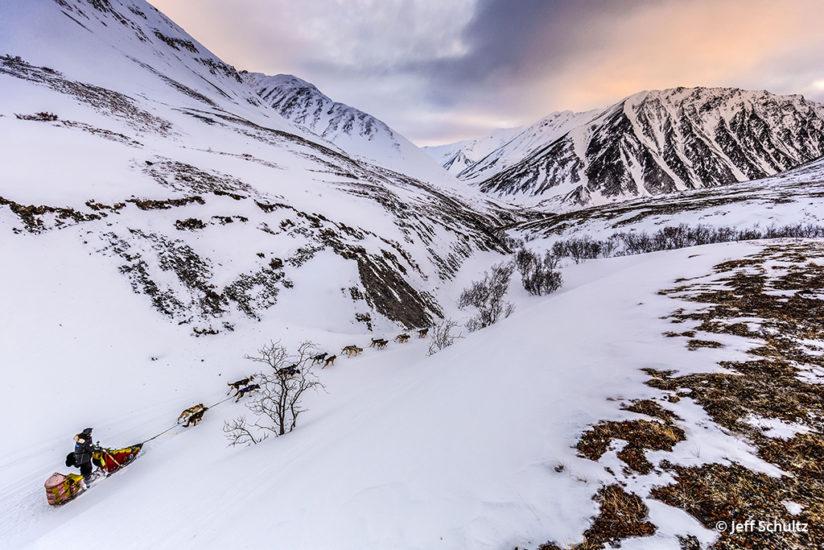
Wade Marrs on the trail along Pass Creek in the Alaska Range after leaving the Rainy Pass Checkpoint on the way to Rohn during Iditarod 2016. Traveling by snowmobile the 30 miles from the Rainy Pass checkpoint to the Rohn checkpoint, I spotted this vantage point from below. My guide and I had spent nearly 45 minutes waiting on teams to come by. Two came during that time, and then the weather began to clear to the west. Thinking the sun might just light up the sky, we waited on another team. Sure enough, the sky opened, the sun lit the clouds from below, and a musher came by at just the right time.
Getting out onto the trail where some of the more scenic and better photography can be found is a bit more involved. While not cheap ($4,000 to $12,000), there are a number of bush plane air-taxi services (see sidebar, below) that offer clients a seat on one of their three- to seven-passenger ski planes as part of a tour package to “chase the race.” One of the better ways to see and experience the Iditarod, these packages will take care of finding accommodations along the trail and fly out each day from one of the larger villages to view and photograph the dog teams, stopping at the smaller checkpoints.
Iditarod Travel Resources
Iditarod Air Taxis
• Sky Trekking Alaska, skytrekkingalaska.com
• Rust’s Flying Service, flyrusts.com
• Sheldon Air Service, sheldonairservice.com
• Talkeetna Air Taxi, talkeetnaair.com
• Regal Air, regal-air.com
• Ultima Thule, ultimathulelodge.com
Some of the more boutique air taxis will even stay with you and guide you to the smaller checkpoints, where the accommodations are a bit more primitive, like sleeping on the floor of the local school. This is by far the best way to get better photos and to immerse oneself in the spirit of the Iditarod. Some of these air taxis also offer less-expensive day trips from Anchorage during the first day or two of the race.
While not as intimate as a tour with one of the air taxis, there are a small number of tour operators who organize Iditarod trips using commercial airlines. These, too, can be a good way to experience the Iditarod.
For the photographer who wants the ultimate Iditarod adventure, consider hiring a personal pilot with a lot of Iditarod experience. It will be just you and the pilot in an even smaller plane, able to land in many more places along the trail to get more intimate images.
Jeff Schultz has been the official photographer of the Iditarod Trail Sled Dog Race since 1982. See more of his work at schultzphoto.com.
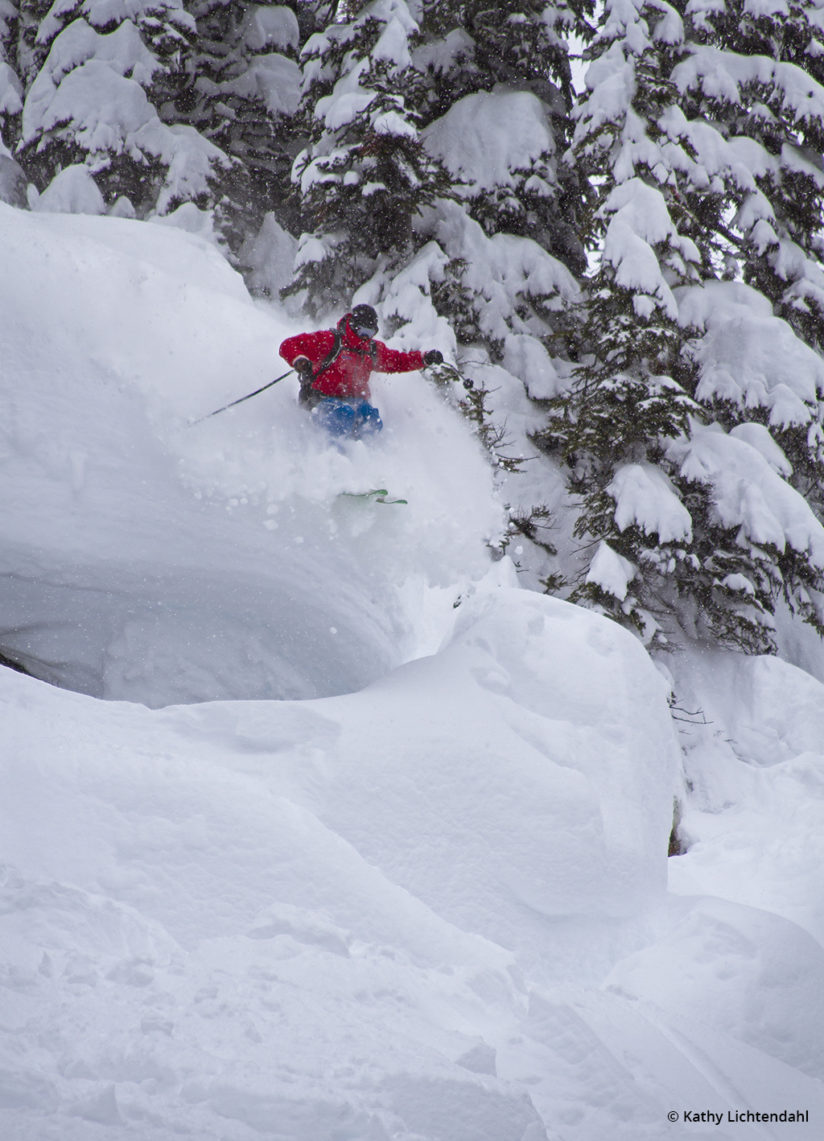
]]>Back-country terrain provides the opportunity for images of athletes that are not often possible at a ski hill.
The first half of my life was spent on Prince Edward Island, Canada. Despite an abundance of snow for much of the year, the highest peak on the Island is a not-so-staggering 450 feet, so downhill skiing was not part of the equation, although touring on cross-country gear was an occasional pastime. It wasn’t until I moved to Cincinnati, Ohio, for work in the early 1990s and started dating an avid skier that I began to explore serious downhill momentum. My debut backcountry ski adventure took place on our honeymoon, spent at a small hut in the Selkirk Mountains of British Columbia. The fact that we stayed married after that week and remain so to this day is a true testament to our love of the outdoors and each other.
Since that time, we have spent numerous days in the mountains on either alpine randonee or cross-country touring gear. Over the years, our escapades have included a winter traverse of the Haute Route, traveling hut-to-hut from Chamonix, France, to Saas-Fee, Switzerland, over a period of eight days; five days skiing from cabin to cabin in the Canadian Rockies; and, most recently, spending a week dragging an 80-pound pulk loaded with tent and all the necessities from the Wyoming end of the Beartooth Highway across the high plateau of the Beartooth Mountains and down Mount Maurice into Red Lodge, Montana.
Skiers enjoy a lunch break on the frozen surface of Goose Lake in Montana's Beartooth Mountains.
While I enjoy any chance to spend a day skiing laps up and down gnarly slopes, my real love for the sport comes in those multi-day treks into the wilderness, pushing up and over obstacles for the chance to see a vast, mountainous landscape devoid of manmade structures. In the early days, I would always have a small point-and-shoot along to record the journey. In the last few years, I have started carrying my DSLR equipped with a 24-105mm lens in my pack, as well as a GoPro that fits on my helmet mount. It wasn’t until I purchased an F-Stop camera backpack that I felt comfortable skiing big slopes on day trips with my camera. Its original Loka pack fits me better than any backpack I have owned, and there is just enough room for the necessary shovel, probe, water, lunch and a warm layer, in addition to camera gear. Its “internal camera unit” provides extra protection for the camera and lens, and the small pockets for batteries, cards and filters are in the side of the pack resting against my back so I don’t worry about batteries getting cold. There are plenty of external straps to tie on my jacket if I am climbing or even to connect my skis if I have to boot-pack. A couple years ago, I designed and constructed a sling that attaches to the front of my pack and allows me to trek with my camera in easy reach.
When my husband and I moved to northwest Wyoming two decades ago, most of our friends assumed we would be skiing right outside our front door. But the reality is that the Bighorn Basin, containing some of the lowest land in the state, is a semi-arid plateau with an average annual rainfall of between 6 and 10 inches. It is a rare winter when we see more than a dusting of white stuff in our yard.
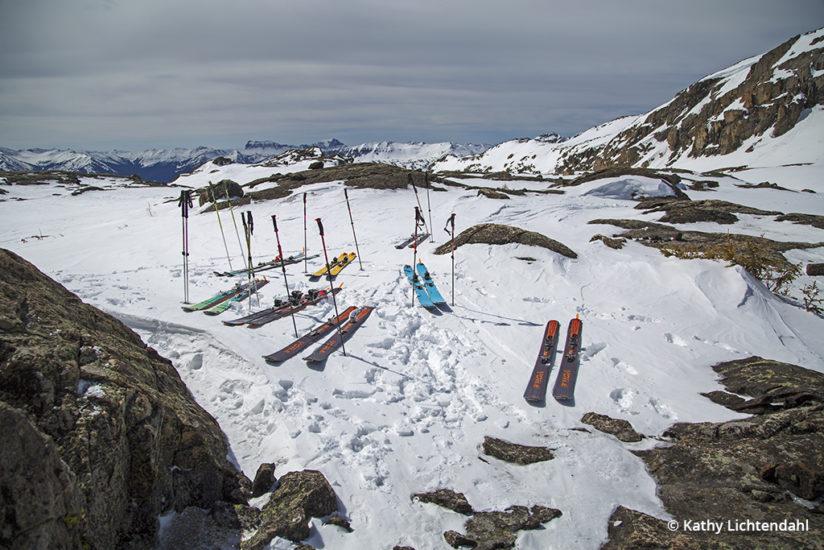
Skis are temporarily abandoned on a rocky summit as their owners take a break after a steep climb.
Luckily for us, the basin is surrounded by mountain ranges, and we can be in some of the finest powder in North America within a couple hours. Cooke City, Montana, is located just 50 miles away as the crow flies. Often described as a “catcher’s mitt” for weather, the area gets about 300 inches of snow every winter. From early November to early May, the rustic town can only be accessed by automobile via Yellowstone National Park. But from our side of the Beartooth Mountain Range, we can drive up and over Chief Joseph Highway to a large parking area at Pilot Creek, and from there we have the option of strapping on our skis for a tour of the Beartooth Plateau or jumping on snowmobiles and carrying our randonee gear into some of the best back-county ski terrain I have ever experienced.
Day trips are a great option, and a lot of landscape can be accessed relatively quickly if you have a snowmobile to get you to the starting point. If your goal is a tour rather than the thrill of the hills, you can ski right out of Cooke or take your snowmobile or car another four miles to Silver Gate, where you leave the mechanical gear and head off into the northeast corner of Yellowstone for what often turns out to be a private visit to the nation’s oldest national park.
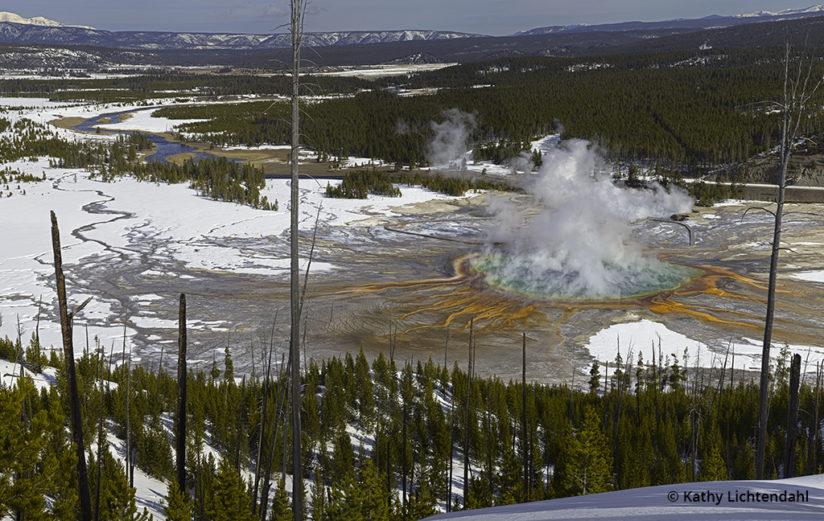
A rare winter view of Yellowstone's Grand Prismatic Spring is only possible by forging a trail through heavy snow to the top of a hill to the east.
If, on the other hand, earning your turns is the objective, your best bet is to ride your machine to the edge of the National Forest Wilderness boundary and head off from there to find your thrills. The Cooke City area has long been a mecca for snowmobilers, and that trend has only intensified since restrictions were put in place limiting unguided riding in Yellowstone. In non-wilderness areas of the national forest, you will almost certainly find yourself competing directly with snowmobiles on even the steepest of slopes, not an ideal situation for many reasons, not the least of which is increased avalanche danger. The machines are not allowed to enter the wilderness area, so as soon as you cross that invisible but well-known line on your skis, you may still hear the drone of engines, but you will no longer be fighting them for an untracked line.
If you don’t have a snowmobile of your own, there are several options for hiring a tow further into the backcountry. The ideal situation is to use someone like Ben Zavora of Beartooth Powder Guides out of Cooke. Several years ago, Ben began working with the National Forest Service to obtain a permit for a yurt near the wilderness boundary 7 miles northeast of town. The canvas structure comfortably sleeps six and is equipped with a wood-burning stove for heat and melting water and a pair of propane burners for cooking. Another option offered by his company is the Woody Creek Cabin, located on a small inholding within National Forest two and a half miles south of town. The cozy cabin has room to sleep 10 guests. Both structures offer the opportunity for several days of exploration in the nearby wilderness terrain while providing a base camp to leave any extra gear you might not need that day. With the luxury of space, I am able to take along a portable solar charger that allows me to charge the GoPro batteries after a day of shooting. With a little extra effort and a 12v car battery cable, I could also juice up my DSLR batteries, but I usually find it easier to just make sure I have two extra batteries along. I also limit my image replay viewing to conserve energy and, as previously mentioned, do what I can to keep the batteries reasonably warm.
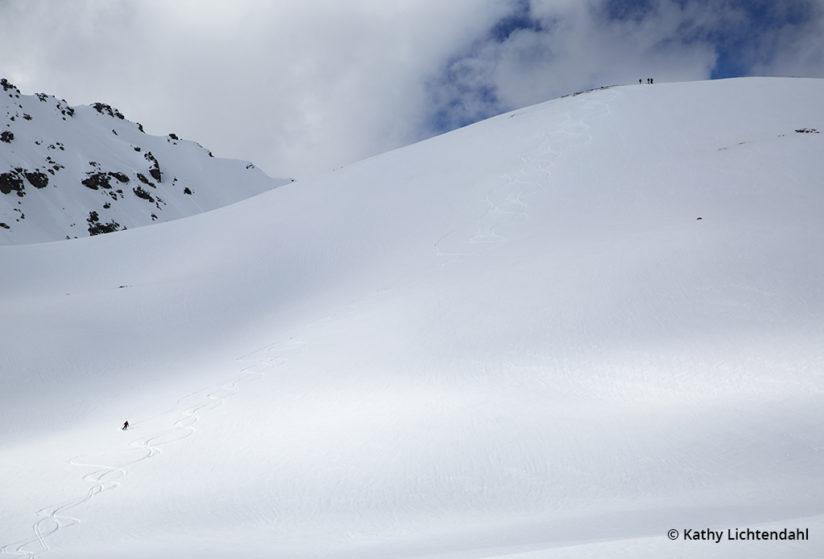
Vast open spaces surround the skiers on "Goose Bumps.”
It makes sense to spend a little time practicing shooting snowy terrain before you head into the backcountry so you are comfortable with your settings and the handling of your gear in cold conditions. Consider taking your gear for a test run or two at the local ski hill and running through a few scenarios while keeping a close eye on your histogram. If you are using evaluative metering, you are probably going to find that you will need to open up two-thirds to one full stop to properly expose the snow, something that seems counterintuitive to many people.
If you decide on a winter visit to this area, you might also want to consider a side trip deeper into Yellowstone. A variety of back-country options exist out of Mammoth Hot Springs as well as Old Faithful. To access the latter, you need to book a spot on a snowcoach from Mammoth or West Yellowstone, or make arrangements to join a guided snowmobile tour from one of the gateway communities. Once in place, you will have access to a number of groomed and un-groomed trails ranging from extremely easy to very difficult. Plan on staying at least two nights at Old Faithful Snow Lodge to make the most of your visit.
Kathy Lichtendahl is a professional photographer and photo educator based in northwest Wyoming. See more of her work at lightinthevalley.net.
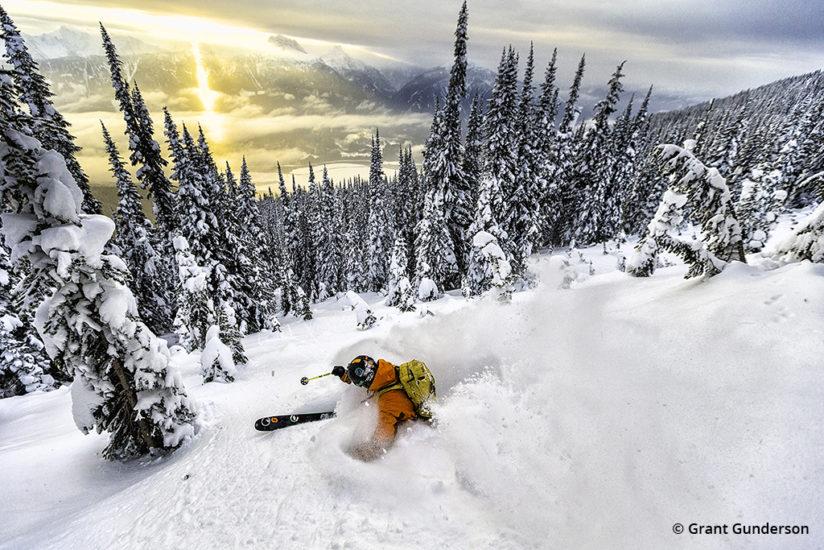
]]>Mount Shuskan, North Cascades National Park, Washington. “My personal motto has always been, ‘If I can create images that make myself or the general public want to spend time in the mountains or want to go ski or mountain bike, I’m going to be successful’. That’s the kind of stuff we are always looking for. What’s going to entice as a skier or mountain biker to want to go do it? Most of the brands that I work with really understand that.”
It could be argued that Grant Gunderson’s photographic philosophy boils down quite simply: His goal is to have fun while making never-before-seen images. Seemingly born with a deep love for snow skiing and mountain biking, he has turned these passions into a thriving career. Still, he’s careful not to let the hard work outweigh the adventure.
“I make sure my work is fun, obviously,” he says. “I tell everyone I can make a helluva lot more money doing anything else besides photography. I have an engineering degree that I could use, but never have. I do this because it’s fun, and I’m passionate about it, and I want to be out there doing it. If we’re not having fun, we’re done for the day. There are always a handful of days during the year when it’s going to be great skiing, and I’ll say, ‘I don’t care how great it’s going to be to shoot today, we’re going skiing.’ And I leave the camera bag in the truck.”
Gunderson’s fun-loving demeanor is more than just lip service. He actually has kept himself from plunging headfirst into more mountain biking assignments—a relatively new addition to his portfolio—for fear that this personal passion might turn into just another job. But when biking clients see the quality of his work, they inevitably want more.
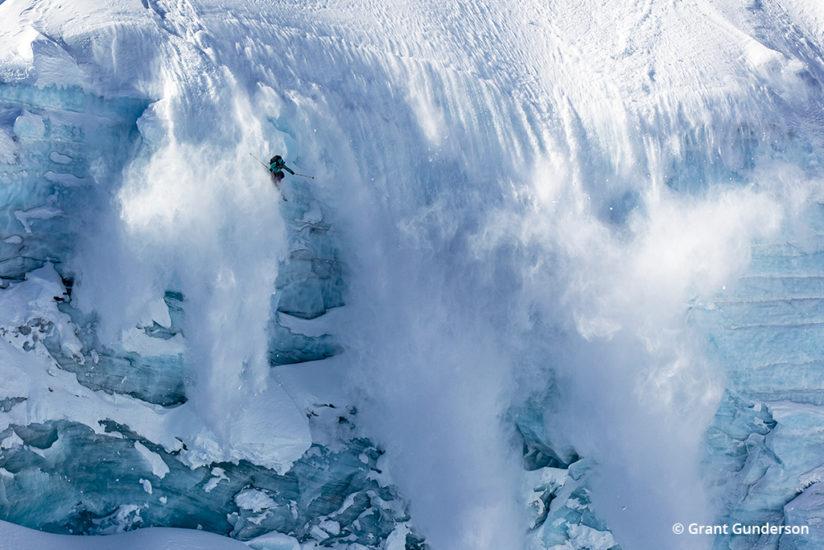
Rutherford, Whistler, British Columbia, Canada. “This image is out in the back country, and we had known about that spot for a few years, but it wasn’t really in the best shape to go do it safely. We happened to be out that day and the conditions were pretty much perfect, the avalanche conditions were very low. We had been in that area for a while so we had a history of the snow and we knew it was steep enough that the top layer of snow as going to slide very little, only three or four inches of snow that actually slides. So we knew we would get a little bit, we knew it would be dynamic looking, but the risk of avalanches was one of the big barriers. It’s probably 60 feet. And from that situation and it’s not just me and Josh. We have four other guys there so in case something happened, we had a rescue team with us, basically.”
“It’s the only thing I’ve found that gives me the same rush as skiing,” he says of mountain biking. “I’ve gone all winter skiing, the last thing I want to do is turn my summer passion into a full-time job, as well. I’ve really been resisting it, and it’s at the point now where I’m, like, okay, it’s time to do this.”
Know Your Sport
One look at Gunderson’s beautiful images, and it’s clear why clients keep calling. It’s not just his knack for capturing peak action and decisive moments, it’s his ability to put the athlete in context—to show a beautiful forest or mountain scene with an athlete in motion. It’s an approach he was fortunate to pick up early on.
“I think skiers have always enjoyed seeing the mountains and the environment,” says Gunderson, “and there just so happens to be a skier in there. I’m usually selling an escape. I’ve found there’s a lot of interest from skiers on the East Coast, places where there’s not the best skiing. It’s the average skiers who want to go out West for two weeks a year.”
Mount Baker, North Cascades, Washington. This is one of the very few shots for which Gunderson used autofocus. “On that particular shoot, I was working with a film crew at the same time, so it’s a lot harder to set up one still shot that way. I was shooting a lot more auto focus because the action is a lot longer. For me it’s all about the 1/1000th of a second, it’s got to be perfect. For them they need the lead in, the pre action, the lead out so it can blend together. Because we’re shooting a much longer lane, or much longer period of skiing, I’ll do a lot more of auto focus and follow focus to make sure I’m not missing a secondary moment, and sometimes the secondary moments are just as good as the primary.”
No average skier himself, Gunderson made his name in the mountains as a kid growing up in Yakima, Washington, where he and his friends spent all their time skiing. They took turns photographing each other until it became clear that Gunderson’s pictures of them were a lot better than their pictures of him. He was a natural, both on the skis and with the camera. In college, he sold his first photographs and was hooked.
“I was, like, ‘Wow, I can actually make a living doing this,’” he says, “and it pretty much beats the hell out of being an engineer and sitting behind a computer all the time.”
Break From The Pack
Gunderson founded The Ski Journal, where he served as photo editor for six years. It became an opportunity to surround himself with the world’s best ski photography. He studied the images closely, learning key lessons.
Revelstoke Mountain, British Columbia, Canada. “Everyone always asks what my favorite lens is, and I always tell them my favorite lens is the best one for the job. Because it always changes. I own pretty much everything Canon makes, as far as lenses go.”
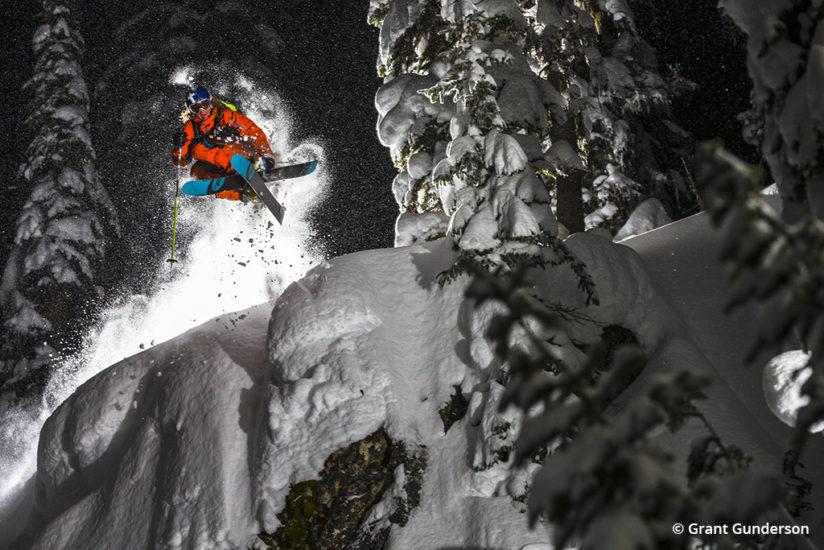
“As a photo editor,” he says, “I’ve seen so many images come through, it all starts to look the same. Unless it stands out, it’s not going to get picked up. That’s why I have a lot of motivation to try to do stuff that’s different. For me, it’s about wanting to create an image that someone hasn’t seen before. It’s really easy to go out and create really beautiful images in the mountains because the mountains themselves are beautiful and all you have to do is show up. But, you know, how can I do that in a way that hasn’t been done before? For a while, I was looking at skateboard imagery where they were using a lot of flash, and no one had tried to bring big flashes into the backcountry. So we were dragging 25-pound Elinchrom flash packs into the backcountry with us to shoot. Then, as soon as I noticed the rest of the competition was starting to do that, I started doing a lot less of it and I went on to doing other things. I’m always trying to come up with something that the rest of the guys aren’t doing yet, and try to be a step or two ahead of the field.
“The biggest advice I can give,” Gunderson adds, “is to try to be creative and come up with your own style, your own look. That’s what it’s going to take to be successful. If you just go out and copy an image that’s beautiful, it’s already been done and no one is interested in purchasing it. It’s constantly trying to be creative and come up with something new. I always look at what other photographers are doing—not to copy them, but to know what’s going on so that I can do something different.”
One particularly different technique Gunderson has employed is black-and-white imagery. It’s not something that’s seen very often in sports—snow skiing, in particular.
Monashee Powder Snowcats, Monashee Mountains, British Columbia, Canada. To succeed commercially, you need to know the sports you’re photographing. “The devil’s in the details. For example, you could have one of the best looking ski shots you’ve ever seen, but if the pole plant’s a half degree off, it’s probably not going to run because the competition’s that high. That’s why it’s important to be an active participant in the sports you shoot. Because you’re going to see those little tiny details that if someone’s not an avid skier, they’re not going to notice. Clients have asked me to shoot things I don’t do, like rock climbing, and I tell them I’m just not the right guy for it. I’m a really strong believer, especially with action sports in the outdoors, you can’t really document it well unless you’re an active participant in those sports, to really know the nuances of what’s going on.”
“Skiing is very beautiful in color,” Gunderson says, “and everyone really wants to shoot in color. It’s bright skis and bright jackets. That’s what was cool with the flash; in these dark and stormy environments, I could get really vibrant color. But once everyone else started doing it, I said, ‘What can I do that would be different?’ So I went on a big black-and-white kick and shot almost all black-and-white for a year. When you shoot in black-and-white, you have to think more in tonal range than you would otherwise. I think doing that has helped me going back and shooting color since then. I think about it both ways now.”
Think Safety First
The main thing Gunderson is thinking about during any shoot isn’t photographic at all, and it’s not particularly about having fun, either. Mainly, Gunderson is concerned with trying to keep himself, his crew and his athletes safe. It’s the number-one priority in the mountains.
“I think experience allows me to make safer decisions easier in the backcountry,” he says. “It’s easier for me to walk away from something that’s not safe. I think that’s a skill that’s very important. I’m glad I finally developed it. A wise old mountain man told me when I was really young that you start your time off in mountains with a handful of luck and hopefully get a handful of knowledge before that wears out. That’s definitely true. Safety is a big factor, especially with avalanche conditions. Speed, a lot of times, goes with that. If I save some weight in the bag, I could get in and out of what could be a crush position way faster and minimize my time and risk.
Heliskiing in Seward, Alaska. Even when on high-profile commercial assignments, Gunderson usually works solo, without a big crew. “90 percent of it is me and two or three athletes. A lot of times in the backcountry, it’s just not safe to bring in a big production team. Definitely there have been times where I’ve worked with 30 people, but that’s in a way more controlled environment, closer to the resort, in bounds, where ski patrol is going to make sure everyone is safe. Most of the stuff I do is deep in the backcountry where you can’t bring a big crew of people.”
“I see a lot more people going out and trying to do what we’re doing,” adds Gunderson. “That really weighs on me. I think they see these beautiful shots, or they see this amazing footage in a ski movie, but they don’t realize the support network that we’ve developed behind the scenes to produce an image. For example, everyone that I work with carries a VHF radio, and I’ve developed relationships with the ski patrol where, if there’s an accident, I can immediately talk to them. If we’re in the backcountry, I can immediately call up a helicopter for a rescue, or if we’re at a heli-ski operation, I’m going to be directly with the pilots so they all know we’re on the same page. The average Joe doesn’t know that.”
Protect Your Gear
The other safety issue Gunderson faces, while certainly less serious than life or death, is no less important to the functioning of a photography business. Working in cold, snowy conditions can be perilous for camera equipment, too.
“Moisture is a bigger issue than cold,” Gunderson says. “Basically, if my gear is cold, I can’t unzip that pack until I’m done for the day. So, if I come inside, that pack either stays outside someplace safe, or if it comes in with me, it doesn’t open up until we’re done for the day. I’ve tried using various tricks in the past, putting stuff in Ziploc® bags, then opening it up gradually, but once you open it, it’s done.
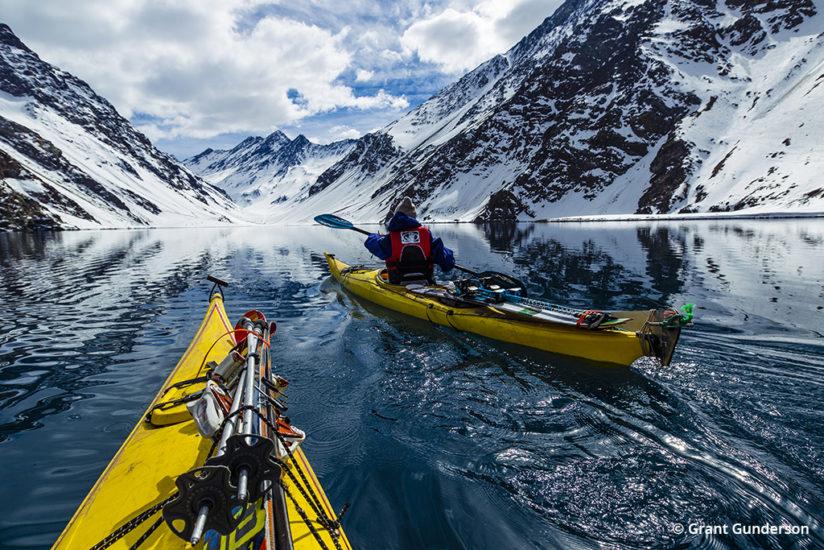
Laguna del Inca, Andes Mountains, Portillo, Chile. “That was kind of a funny deal,” says Gunderson of this image. “We were on a photo shoot at a place called Laguna del Inca, which is right on the border of Chile and Argentina, pretty high up in the Andes. That particular summit when we were down there didn’t get any snow, and it’s like what are you going to do? You can’t ski without snow. We found out that the owner of the resort had sea kayaks on the lake in the afternoon. So we commandeered them and took them across the lake to find some snow. I was pretty happy they were yellow and orange, but I was even happier that I didn’t tip the kayak with the camera and all my gear in it.”
“I’ve gone through a lot of camera bodies,” he continues. “I was still shooting the 1D Mark IV when I actually ruined two camera bodies in one day. That was a very expensive day. I try to keep everything zipped up to minimize the amount of snow that gets into the camera bag. The other thing I’ll use is basically jackets on the cameras. For a while, I would make my own. Then I found out OP/TECH makes really good jackets for the cameras. And it’s definitely cut down a lot on the amount of cameras I go through. Now I’ll wear them out before the moisture destroys them.”
Follow The Light
When he’s not fighting with the weather as it’s trying to destroy his gear and drive him off a mountain, Gunderson is battling changing light. There’s always too much or too little, and only rarely is it just right.
GUNDERSONS’S EQUIPMENT
Canon EOS 1Dx
Canon 16-35mm f/2.8 L II
Canon 24-70mm f/2.8 L II
Canon 70-200mm f/2.8 L IS II
Canon EF 400mm f/5.6 L USM
Canon TS-E 90mm f/2.8
Canon 85mm f/1.2 L II USM
Canon 15mm f/2.8 Fisheye
Elinchrom AS Speed strobes with Type A heads
Pocketwizard transceivers
F-Stop Satori packs
“Shooting skiing,” he says, “the biggest thing you’re dealing with, photography-wise, is that you have too much light. With mountain biking, it’s the exact opposite because you have too little light. The best mountain biking seems to be deep in the forest. So the best days to shoot are overcast, gray days, more consistent light, but there just isn’t much of it. But the thing with snow is, if you have too much light, it means you probably have too much sun, so it’s not going to be good for skiing anyway. With skiing, good snow tends to follow good light. We’re kind of looking for a combination of both. The challenge with skiing is that you can set a shot up, but you only get one chance, so if the athlete misses the mark or the flash doesn’t fire, all that setup work is done and you have to move on. It’s a pretty fast pace of constantly trying to be following the light and being productive at the same time.”
]]>https://www.outdoorphotographer.com/tips-techniques/sports-adventures/big-air-deep-powder/feed/0Luck Favors The Prepared
https://www.outdoorphotographer.com/tips-techniques/sports-adventures/luck-favors-the-prepared/
https://www.outdoorphotographer.com/tips-techniques/sports-adventures/luck-favors-the-prepared/#commentsWed, 26 Aug 2015 00:00:00 +0000http://www.outdoorphotographer.com/locations/%locations-category%/luck-favors-the-prepared/Unlike an editorial photographer who might accompany a climbing team as it surmounts a new obstacle, Tamiola puts his visual storytelling approach to work on commercial assignments.
"Little people, big mountains." That's how alpine adventure photographer Kamil Tamiola sums up his aesthetic. "I always explain it's little people, big mountains and clouds. You can really break it down to these very simple things. But there is a very powerful message these photos convey. You can build massive, dramatic, epic stories out of this. Or you can put the guy in the ice cave and just illuminate him and use the ice as a reflector. You don't have to do more. It's a very simple visual language. Using scale, using weather conditions… All these tiny factors tell a story. People going on an epic journey in the big mountains. The clouds emphasize the drama and show the scale of the mountains and the challenge the climbers had.
"I believe photos are made of visual elements," Tamiola says, "visual features. It's a visual language that's used to communicate things. For example, the expressiveness of the faces of the people, or using angles to communicate the story, like an establishing wide-angle scene, or a tight telephoto to bring in some action. It is all a visual language, and that's why I call it visual storytelling."
Unlike an editorial photographer who might accompany a climbing team as it surmounts a new obstacle, Tamiola puts his visual storytelling approach to work on commercial assignments. So he strives to eliminate chance and ensure the success of a shoot by bringing together the ideal subject in the perfect location at just the right time. It's all about preparation.
"I really spend a lot of time thinking about the location," Tamiola says. "Ninety percent of the actual work is on preparation. I spend a lot of time looking for information, talking to mountain guides, telling them I'm looking for a place where I have a massive mountain, or a wall of granite, or a place where the glacier is very blue with lots of features and open space. And then we spend lots of time going over pictures and sometimes hiking to locations, because I'm 20 minutes from Mont Blanc. I tell people this is what I've found on Google images, this is where we are going to go, I believe that if the clouds will kick in we'll have lots of drama, lots of interesting things happening."
Tamiola takes a rigorous, almost scientific approach to preparation, and for good reason: he holds a Ph.D. in applied physics. The day we spoke he had just been granted a provisional patent for an algorithm he developed to accurately calculate nighttime long exposures. When Tamiola speaks of his experiences testing cameras or lenses, or how the inverse square law factors into capturing nighttime imagery, or how a particular bit of software has been better engineered than another, he's bringing to bear a Cambridge education in a field of study that applies directly to photography. When Kamil Tamiola talks, photographers should listen.
Kamil Tamiola works in locations where the weather is more than an aesthetic concern. He explains, "Weather is so important. In the mountains, especially the higher ones like the high Alps, which are the highest in this part of the world, the weather can change in 20 or 30 minutes in summer. The clouds can create very quickly. Some of the mountains, because of the vicinity to the Mediterranean Sea, have a very peculiar microclimate with, for example, electric storms building up quickly. And trust me, there is nothing worse than being stuck on the middle of an open field glacier, in the middle of a rolling electric storm. You have rolling thunder, the lightning hitting the glacier and the current propagating on the surface of the glacier and electrocuting people. Stupid! These are not avalanches. This type of stupid thing, like not checking the weather forecast properly, or not discussing with a mountain guide the day before, who was there, who can tell you, look, the weather is good, but it's too warm, can result in a catastrophe. Many people, mountaineers even, they start taking photos and not paying attention to conditions around. And when the storm comes there will be no helicopter rescue. Helicopters don't fly in storms!"
Tamiola is so diligent in preparing for his climbs because he's a big believer in taking control of a photo shoot, not only for the sake of the dramatic images he's set out to create but also so that he and every other member of his team makes it back safely.
"The beauty of working in any mountain environment," he says, "is that getting up the mountain is 50% of the success. And the other 50% is getting safely down. This applies not just to photography but to any activity which involves mountains. Statistically, 80% of the accidents in the high mountains happen on the descent. You're tired, euphoria kicks in, you're happy, 'Alright, we wrapped it up, the weather was good!' These accidents aren't spectacular or dramatic. Armageddon style things don't happen usually in the mountains. Mountains rarely fall apart. What happens is people do stupid things, like not clipping carabiners or not tying the ends of the rope and they rappel off the rope. Or unclipping on the glacier to go faster, and then they just enter a crevasse. Silly, ridiculous things. This is the other side of outdoor photography in the mountains."
Weather is also a major risk factor. Storms arise in mere minutes and can trap climbers on a treacherous descent or pin them to a glacier as lightning cascades all around. Being caught off guard by an impending storm is bush league, a definite no-no. It's rigorous preparation that gives Tamiola the absolute confidence in the success of a shoot and the safety of his team.
For the uninitiated, here is how Tamiola says mountaineering photographs are usually made. As part of a team of a handful of climbers, the photographer is roped to his colleagues for safety—just as they would be for any other climb. Because of their proximity, wide angle lenses are the order of the day; subjects are literally tethered within a few meters of the camera. On occasion he may reach an area where he can anchor himself to the mountain and ask advanced climbers to repeat a section of the climb for the sake of a photograph. This is when the expertise and professionalism of his team is especially important.
"This is what I explain to marketing people," Tamiola says. "I will be working with mountain professionals, people who are basically paid to do their job. And their job is to get my ass safely on and off the mountain, not to have casualties there. Because this is serious. People die doing this. And the second thing is, when I ask them for something, they just do it. They won't be like, oh, I don't feel like doing that."
The more technical a climb, the more safety equipment is needed, which limits the amount of photographic equipment Tamiola can carry. At more easily accessible locations he has used Phase One medium format digital cameras along with Elinchrom and Profoto strobes. Most of the time, though, he prefers a Canon EOS 5D Mark III with natural light—or, on rare occasions, a Speedlite.
For the image of a climber swinging an ice axe as she ascends a sheer ice wall, Tamiola filled the backlit shadows with a Canon 580EX II. For a shot of an ice climber at night, the cave was illuminated with Elinchrom Quadra strobes—enabled, of course, by a fair amount of preparation.
"I went the day before to see how it looked," Tamiola explains. "I knew the climb, I knew it was stable, they're professional ice climbers, they told me they could climb it 200 times, so I looked at this hole from many angles. And then of course we go in the middle of the night, we bring all this junk, we try to keep it warm, because at -20C˚ batteries discharge immediately. And it's a completely different type of shoot, where I already know what I'm aiming for, and of course I can't see how it looks, but I know what I'm looking for, I know what the safety margin is, I know should the weather fail—and the weather failed, because it started snowing on this shoot quite heavily—I know what to do. That's exactly the difference between doing it on the professional level and going on a hippy happy adventure where maybe we'll do it or not. No no no. If I can't do it, I have a plan B. If the weather is bad here, plan B is to go there. If there's no plan B, there must be plan C."
Prepared as he may be, Tamiola refers again and again to his love for experimentation. It's how he discovers new techniques and new locations and how just a few years ago he discovered a love for nighttime photography. Shortly thereafter he made an image that would go viral, bring him a modicum of internet fame and accelerate his photography career. It's an image of a man outside his tent, in the middle of the night, preparing for a climb.
"The photo is pretty cool actually," he says, "because it's a blend of adventure and long exposure photography. There are lots of things happening. Lots of people accuse me that this photo has been Photoshopped completely, because they could not believe that you could combine long exposure photography of celestial objects, the starry skies, and having a person with a head torch and things happening. It has been taken in the very heart of the Mont Blanc basin. In the background you have one of the summits of Mont Blanc, and on it you have climbers with headlamps. The photo is taken exactly at three in the morning. Why? Because this is the moment that people start their climb to the summit. At that moment, you have to wake up, drag your ass from the tent, set up… and that's what this guy is doing. This photo is for me the essence of what I like about mountaineering. It's about understanding where you are, understanding how we need to do things, committing to it, dragging your ass out at night, when it's very cold—really it's annoyingly cold—and you look at the sky and the stars and it's surreal. It's just surreal."
Tamiola edited this image as he does all of his photographs, relying on what he calls the absolute best RAW processing algorithm on the market.
"The whole processing happens in Capture One," he says. "It's absolutely the best when it comes to debayering and really squeezing the last bit of color out of the files. And I say this as a scientist. This is why when Phase One approached me it wasn't about money or getting a Phase One camera to work with, or a self-marketing thing. I said, 'I've used your software and it's awesome, and if I could be associated with it, yes please.' It's not the best software, it's actually quite slow, but [technically speaking] it gets you far more. It's really advanced."
The scientist turned photographer is confident in his findings because of his testing, which again brings him back to that love of experimentation. He may focus his efforts on preparation and safety, but this is all in service of an idea—so that when he's on location in the Alps, up before the sun, shivering cold and monitoring a changing weather pattern, he's set himself up for success. By constructing a framework he is free to improvise, to experiment with all of the variables of weather, lens, lighting and composition. If it weren't for experimenting, he may not be a mountain photographer at all. He might still be in a lab in the Netherlands, doing whatever it is applied physicists do, working with a photospectrometer instead of a DSLR. If not for the love of experimentation that ultimately led to a career change, the world of Alpine adventure visual storytelling would be missing a strong, clear voice.
"For me," he says, "photography is about experimenting. And this applies the same to outdoor photography of any sort. I always explain it's not just about a powerful visual that tells a story, but it's about experimenting—not just with the settings of the camera, but with the weather, with the landscape, or with the scenarios, or with lights. This is what excites me. I love being in the mountains. That's why we live in the Alps. But at the end of the day, you know it's always very exciting when you're in a new place and you can really experiment. With bad weather kicking in, you've planned a nice photo shoot and you just have to say okay, with this weather, what can we do?"
Kamil Tamiola's Gear
Canon EOS 5D Mark III
Canon EF 16-35mm f/2.8L II
Canon EF 24-105mm f/4L IS
Canon EF 24mm f/1.4L II
Canon EF 17-40mm f/4L
Canon EF 70-200mm f/4L IS
Profoto B1s
Elinchrom Quadra RX
Canon EOS C100 for motion work
DitoGear OmniHead (6-axis motion-controlled head system) attached to Cinevate heavy-duty sliders for time-lapse work
G-Technology G|DRIVE ev ATC waterproof external hard drive
]]>https://www.outdoorphotographer.com/tips-techniques/sports-adventures/luck-favors-the-prepared/feed/4Off The Grid
https://www.outdoorphotographer.com/tips-techniques/sports-adventures/off-the-grid/
https://www.outdoorphotographer.com/tips-techniques/sports-adventures/off-the-grid/#respondTue, 21 Oct 2014 00:00:00 +0000http://www.outdoorphotographer.com/locations/%locations-category%/off-the-grid/Far from the Tropic zone, Chris Burkard’s big-picture outlook leads to images that are a mix of stunning landscapes, dramatic coastlines and out-of-the-ordinary surf action.
"A serene Arctic morning on the beach with jagged peaks looming in the background. I exposed a bit longer than normal to smooth out the waves and show off the entire coastline. The beauty of this place keeps me coming time and time again," says Burkard of the landscape at Hofn Beach, Jökulsárlón, Iceland.
"All I ever wanted to do was shoot landscapes. That was the first thing I was ever passionate about. I never really had some desire to be a surf photographer, by any means," explains Southern California native Chris Burkard. Yet the 28-year-old has quickly made a name for himself with his iconic coldwater surf images, serving as Senior Staff Photographer for Surfer Magazine, and shooting for clients like Toyota and Patagonia, while becoming a prolific Instagramer with over 385K followers.
I met up with Burkard in Huntington Beach, Calif., during the U.S. Open of Surfing, where he shot the women's long board event. We sat in the Shorebreak Hotel's upstairs lobby next to Burkard's solo exhibition display.
"It's so ironic that we're talking here at the U.S. Open of Surfing, really," laughs Burkard, "because this is the last place that you'd ever normally see me. My passions lie far away from the equator."
Burkard appears more than comfortable in the busy, almost chaotic, atmosphere of Huntington Beach, tossing off his flip flops, casually nodding as friends pass by and quickly connecting his assistants with each other as they arrive, all without breaking the flow of conversation. But he says he much prefers to be "off the grid." He regularly searches out shooting locations in areas of Alaska, Iceland and Norway for ideal waves, landscapes and climate, but also for the remote and intimate feeling they provide.
The landscape, surf action and light all come together in this dramatic photo in the Lofoten Islands of Norway. Surfer Dane Gudauskas, captured at the decisive moment, makes the whole image gel.
"I feel like they have a sense of desolation and a sense of being by yourself, where you can really just appreciate the place. I've really always sought out places that feel wild," explains Burkard.
He continues to describe the feeling of immersion that first drew him to the field of photography. "I want to be on that peak," he says. "I want to be in the ocean. I want to be a part of the action. I want to be a part of those moments that are—that inspire me."
When Burkard started to seriously consider a career as a photographer at age 19, he began by taming his wild side. Instead of instantly diving into the action-sports world, Burkard moved to Utah and studied large-format photography. He developed a selective, finely composed style, and this big-picture approach can be seen throughout Burkard's work.
"I'm always looking for bold mountains with big contrasts," he notes. "That's what has drawn me to the Arctic. Just that idea of redwoods on the beach and pine trees that meet the ocean, big granite cliffs. That's what makes my heart kind of swoon for photographing things. If you look at my work, I think most of my more iconic surf pictures combine a lot of those elements. They give you a sense of place. And that's all I ever aim to do."
Burkard's favorite photo in his portfolio shows off the essence of a full story within a single shot. Taken at the Aleutian Islands, a surfer rides a wave in front of a volcano.
"To me, that image is the most important photograph I've ever shot in my life. I think that it sums up everything—my personal style of landscapes over people and combining the surf and this element of action sports with these beautiful locations, as well as my constant search and struggle for finding surf in the Arctic. That has been the last five or six years of my life, searching for these places," describes Burkard.
"With no roads to the ocean, we relied on ATV to travel the distance from the village to the coast," says Burkard about his 2013 Aleutian Islands trip."As we crested the final hill, we were treated not only with a view of the distant snow-covered volcano, but a point with waves peeling down its right side. It was a moment I had hoped for, but didn't expect to see—clean waves and a clear day in a place known as the 'cradle of storms.' Surfer Josh Mulcoy carves on this wave, a speck amidst the empty Aleutian coastline."
"Honestly, I do feel like I have a dream job, but sometimes I feel like I have the hardest job in the world. It takes a lot of effort and a lot of suffering. That's not for everyone. I've definitely had some close calls," he says.
Recurring frostbite. A busted nose and broken bones. Shark encounters. Facing the interior of a Russian jail cell due to an expired visa incident. But Burkard says his worst experiences have come simply from the brutally harsh cold.
"I was in Norway, and the water was extremely cold. You only last about 20 to 40 minutes. It was getting to be about 30 minutes in the water and my hands were cold, my feet were cold. It was starting to get freezing, and then you kind of start to make bad decisions. I always need to remember that you have to give yourself not only enough energy to get in, but to get back to your cabin or your car. I got so cold. I couldn't really stand because my feet were total blocks. Imagine walking on wooden pegs through slippery boulders. It was the worst thing ever. Really gnarly. I had to have one of the surfers carry me in. Then when you're warming back up after freezing, it hurts so bad. You have to go slow."
Burkard describes this scene in Kamchatka, Russia: "This is one of the most insane sunsets I've ever witnessed. Everyone had to get on top of our truck and watch as the clouds above the distant volcanoes lit up the sky."
Chris Burkard's Gear
Sony a7S Sony a6000 Sony Vario-Tessar T* E 16-70mm ƒ/4 ZA OSS Sony Vario-Tessar T* FE 24-70mm ƒ/4 ZA OSS Sony 10-18mm ƒ/4 OSS Wide-Angle Zoom Sony Sonnar T* FE 55mm ƒ/1.8 ZA Sony FE 70-200mm ƒ/4.0 G OSS Nikon 1 AW1 1 Nikkor AW 11-27.5mm ƒ/3.5-5.6 1 Nikkor AW 10mm ƒ/2.8 ewa-marine housing Nauticam NA-A6000 underwater housing F-stop Loka UL Bag with Shallow ICU Goal Zero Sherpa Series
Yet, he keeps going back for more. "Yeah, I keep going back," he says. "It's totally worth it. Cause if you're not suffering for your craft, then I don't think you're giving enough to it. It's about how can I be immersed and a part of this landscape, whether that means suffering in some way or not."
But there's not just a physical toll to a full-immersion traveling lifestyle. There's an emotional toll, as well. Burkard is a husband and father. His continued career success means more traveling and time away from his family.
"My wife is one of the most amazing people in my life. She's really the absolute glue that holds us together. There's no way to be a photographer that travels as much as I do—there's no way to do it perfectly. It's a constant struggle to stay in contact. I try to give 110% all the time, so I'm not just coming home and partially being there. Nowadays, there's no excuse to not communicate. So if that means a couple hundred extra dollars for a phone bill, it's worth it to be in touch with them."
Burkard is determined not to let photography take over his life, and instead keeps some activities camera-free and precious for himself.
"I think that if everything becomes a work thing, it can kind of start to lose its savor," says Burkard. "It's funny because there's that old saying that the cobbler's kids have no shoes. And it's the same thing with my family. I'm away from them so much, when I'm home I don't want to pick up a camera. I just want to be with them and stare at them and kind of just want to think about how they're growing and stuff, so I don't typically have all these epic photos of my family, and I feel bad.
"I'm kind of purging here," adds Burkard, but in this moment of vulnerability, it's easy to see his ability to fully immerse himself in anything and everything, as well as his openness to sharing these experiences. Pervasive to all areas of his life, this raw intimacy is what continues to make his images relatable and desirable.
You can see more of Chris Burkard's photography at chrisburkard.com.
Instagram, Social Media And 21st Century Success
Social media has played a huge role in my career. For me, the best form of marketing and advertising has been social media, and I've acquired almost every big commercial and major job assignment I've ever done from that. Almost every one."
—@chrisburkard
With an ever-growing social media following and major commercial clients like Microsoft and North Face that he attracted through Instagram, Burkard must be onto something. As social media took off, he realized this could be the best marketing format for his work. He decided to put aside the stress and worry of image stealing and copyright management, and instead chose to share as much work as possible. Of course, along the way, he has developed some techniques and habits that have helped develop his following:
1 First and foremost, post great work consistently.
"I want to inspire people. That's my mission statement as a photographer. I think that for social media, that's a big part of it. I choose to post during 9 a.m. and 5 p.m. every day, except for the weekends when people go out." 2Post images that can be easily viewed on a small, mobile screen.
"You're not trying to fool someone by posting some kind of grainy, crazy black-and-white image that you can't really make out on the phone. I think you have to tune in to what really is going to make sense on that square." 3Curate your feed for your demographic. "Do I shoot for Instagram? No, I don't. But if this is a network and you're selling your product, then you want to know what that network wants to see. There's a good deal of curation—develop a good blend and mix for your channel." 4Communicate with your followers.
"People love Instagram because it breaks down those barriers of access. It's about being open and communicating and sharing ideas and concepts and being part of a community."
Burkard follows Instagramers that inspire him, photographers and non-photographers alike. His top-10 Instagramers to follow are:
]]>https://www.outdoorphotographer.com/tips-techniques/sports-adventures/off-the-grid/feed/0Have Camera, Have Lens, Will Travel: 21 Months of Adventure Photography
https://www.outdoorphotographer.com/tips-techniques/sports-adventures/have-camera-have-lens-will-travel/
https://www.outdoorphotographer.com/tips-techniques/sports-adventures/have-camera-have-lens-will-travel/#commentsTue, 23 Sep 2014 00:00:00 +0000http://www.outdoorphotographer.com/how-to/%how-to-category%/have-camera-have-lens-will-travel/I've always been a believer that what matters most in life is to see, experience and appreciate as much of our amazing world as possible.
Bay Of Kotor, Montenegro. Montenegro was the first stop on our long journey and a place we came back to when we needed to work and save a bit of money. We took a local bus to a lookout point we had seen earlier. The day was completely overcast and the clouds were very low, hiding everything. After Anya and I explored the small town of Perast, the clouds started to lift and this amazing scene appeared before our eyes.
"Explore every place with endless curiosity, dream, let go of all preconceptions, and happily embrace anything." These were some of the words I lived by when, in 2011 and 2012, I traveled continuously all over the world for 21 months. I was very happily living out my lifelong dream of getting a one-way ticket (to anywhere) and traveling everywhere my whims took me for as long as I had a few dollars in my pocket. Oh, and as a professional photographer who has far too often carried far too many cameras, heavy lenses, big tripods and photo accessories, and whose back forbade him to do that again, I dreamt of, and succeeded, in going light, as well.
I've always been a believer that what matters most in life is to see, experience and appreciate as much of our amazing world as possible. Being a professional photographer gives me an awesome excuse to do just that. I must get up before the sunrise to see how the light changes as it screams across, say, the plains of Bagan, Myanmar, or the crowded and dusty streets of India, or the deep blue waters of a South Pacific island location. Being a photographer influenced my long journey every step of the way. I was continuously searching for the next scenic overlook, the next interesting person who had photogenic character or the next beautiful wildlife specimen that I might capture for just a moment with my camera. I was open-minded, flexible to whatever came my way, and I looked deep into the heart of the places I went. I also took a lot of photos.
The best travel photography departs from a common postcard and captures the way of life of the people who live in a given location. Of course, the photographer does his or her best to do that artfully through lighting and composition.
In 21 months of traveling, I honestly don't know how many images I took, but it was well into the tens of thousands. The images showcased on these pages are just a few of my favorites, and I had difficulty narrowing it down to these few. It should be no surprise to readers of this magazine that the world holds endless photogenic opportunities, and all we need to do is open our eyes and minds, and use our abilities to capture them.
As I tell people about our journey—I traveled with my friend Anya, who then became my fiancée, who then became my wife—folks often ask the usual questions of where we went and what we saw and how much it cost, but rarely am I asked why we went. It seems that most everyone understands why someone would undertake such a journey. The simple answer I give if anyone does ask why is just that I wished to embrace the world and experience life. Plus, I love photography. All very simple and very true reasons for our 21-month trip.
Getting in close to people with a camera is challenging. Be genuine and open as you're taking photos, and people often will respond in kind.
So, then, I'll first write the answers to the most common questions I get: How did I manage to take a 21-month nonstop trip? And how did I manage my photo gear? And where did we go?
Tad Fane Waterfall, Laos. We were in a very rural area of Laos called the Bolaven Plateau. While talking to a local shop owner, we learned that there were several waterfalls in the area. He drew us a rough map on a half-sheet of paper and rented us a small motorbike. Anya and I spent an entire day exploring the area, finding waterfalls and photographing everything. This double waterfall drops over 360 feet into the canyon below. I felt supremely honored to be able to witness such amazing natural beauty.
Well, for finances, I merely saved some money each year for about three years leading up to the trip. It actually costs a lot less for such a journey than you might imagine. There are still lots of places around the world where a careful traveler can live on $5 a day. Yes, $5. That's not a misprint. And Anya and I traveled on a budget, saving money on things where we could in order to spend it on experiences, local tours, local guides, etc. Everywhere we went, we traveled as locals, stayed with locals and ate as local folks do—this is always the easiest way to spend less money.
Plus, we traveled light. This was one of my main goals, as I had no financial backing for this journey. I couldn't rely on someone else to pay for extra baggage or overweight bags. Besides, I love traveling light and moving fast. When you need to get on and off several local buses every day, or are traveling by dugout canoe up the Mekong River or by cycle rickshaw in India, having a lot less stuff makes for a lot more happiness. So, you ask, what did I bring for photo gear?
The Taj Mahal is on many people's bucket lists to see and photograph. Here's a different look at the famous tourist attraction from a more unique perspective than the usual postcard.
I brought a Canon EOS 40D and the longest, most versatile lens then available for that camera, a Tamron 18-270mm ƒ/3.5-6.3. This outfit gave me the 35mm equivalent of 29-432mm with a stabilized (Tamron calls it Vibration Compensation, or VC), reasonably fast, autofocus lens. Sure, sometimes I wished for more wide-angle when under an architectural masterpiece, and sometimes I wished for more telephoto reach when we saw elusive wildlife, but 99% of the time, that 29-432mm was all I needed. My only accessory was a polarizer for my lens. I also had two extra batteries and a good-sized JOBY GorillaPod tripod. We photographed every day, almost all day, especially when we got to a new place and didn't need to "move on" till we decided it was time. My equipment held up fine for the entire 21 months.
Indian Woman, Ranthambore Fort, India. India is the most culturally rich, colorful and varied place that we visited. Every person is a photo opportunity, every street holds endless possibilities. I loved this colorful moment, but it only lasted a second until the woman changed her position. Because I had just one lens and was ready, I managed to capture a few frames before the moment passed.
Of course, I wanted to protect my hard-won images, but I didn't carry a laptop. So, as we went, I backed up all my photos onto a small paperback-sized hard drive I carried with me simply by visiting computer centers to burn the images and to make DVDs. Those discs were sent by post to a stateside address of a family member, and I carried an extra DVD copy with me, as well. This allowed me to reformat my memory cards, knowing I had three copies of each image.
Angkor Wat, Cambodia. Hot air balloon is a popular way to experience this place. The Tamron all-in-one zoom was indispensable, allowing for nearly unlimited compositions as the scene changed.
Anya and I brought just midsized travel backpacks, which weighed under 25 pounds each, but they still felt awfully heavy when we had to carry them across a remote Philippine island or when strapped to the back of a motor scooter in Vietnam. Still, we felt liberated and carefree whenever we saw tourists with humongous, wheeled suitcases that weighed more than they did. And, everywhere we went, local people were happy to meet us, happy to have us visit their part of the world and happy to help us out when we needed help.
Sumatran Orangutans, Indonesia. My Tamron lens and Canon DSLR provided enough zoom power for larger and/or friendly wildlife. At an orangutan sanctuary on the island of Sumatra, Anya and I spent five days with a local guide and several of the area's orangutans. Many of the mothers carried babies, and we witnessed and photographed tons of sublime and wonderfully tender moments that week.
The world is much safer and people are a whole lot friendlier than the news would have you believe. In 21 months on the road, Anya and I experienced many hundreds, if not thousands, of small gestures or big helping hands, where a local person was merely interested in making sure we were safe, happy and okay. As only one example, in a deserted mountain area in northern Vietnam, we were trying to get to a far-flung national park and had gone as far as the local bus service went. Walking the last, dusty, 22 kilometers to the park entrance seemed our only option—and not a fun one at that, with full packs under a hot, tropical sun.
The Pyramids, The Giza Plains, Egypt. A severe sandstorm engulfed the area on the first day, blocking any views. Since we had as much time as we wanted in each destination, we waited out the storm, and I finally got this view from out in the desert that I always had wanted to witness.
After just 10 minutes of walking, I heard a vehicle coming. It was a bus full of teenage school kids heading to the national park, and I flagged it down. Even though there weren't any empty seats on that bus, the kids and their driver welcomed us aboard and cleared two seats for us. Then they proceeded to gather around us and showed their excitement at having English-speaking "guests" aboard their bus, talking, being honestly friendly, snapping photos with their smartphones and even exchanging email addresses with us (we still keep in touch). They were genuinely happy that we chose to visit their part of the world.
In the 21 months that we traveled, we visited 23 countries. We started in Eastern Europe, moved from there to the Middle East, then North Africa. We then spent a month in Sri Lanka and 42 days in India. From there, we traveled to Turkey and then back to Eastern Europe, where we stayed put for four months and worked tourist jobs in friendly Montenegro on the Adriatic Coast to save some money. After a great summer living with a Serbian family, off we went to Hong Kong and China, then to every country of Southeast Asia, staying about a month per country. We finished up with a summer in the Siberian part of southcentral Russia.
Obviously, a journey across the world like this, for 21 months, changed my life in innumerable ways. I'm now married to my travel partner. I now have tens of thousands of amazing images from places that not everyone gets to see, and I have a much deeper appreciation for the simple help that kind strangers often offer. Thank you to Anya for your open mind and your willingness to "go anywhere." Thank you to all those who we met and who often pointed us in the right direction.
I had so many supreme photographic moments on our journey that my images and their stories could fill volumes. If anyone were ever to ask my advice about going somewhere, about stepping out of his or her comfort zone, I'd simply say, "Go. Go now. Don't hesitate, travel light, and seize the opportunities that await!"
Tamron 16-300mm
Canon EOS 70D
Time Passes, The Tools Get Better
On his epic 21-month trek, Don Mammoser used a Tamron 18-270mm lens exclusively. This kind of all-in-one zoom enabled him to travel light with an equivalent focal range of 29-432mm on his Canon 40D DSLR. That was in 2012. If he were making the trip today, he likely would be using Tamron's newest all-in-one zoom, the 16-300mm Di II VC PZD and the Canon EOS 70D. The 16-300mm has Tamron's Vibration Compensation technology, and the 70D is an excellent still camera, with Canon's latest motion-capture technology and an articulating touch screen.
Don Mammoser is a professional nature and travel photographer and writer. He has written a series of travel-related ebooks that discuss where, when and how to photograph iconic destinations around the world. They can be found at amazon.com under his name. Don leads exceptional, fun workshops and photo tours to North American and international destinations. Visit www.donmammoserphoto.com.
]]>https://www.outdoorphotographer.com/tips-techniques/sports-adventures/have-camera-have-lens-will-travel/feed/24Shooting The Curl
https://www.outdoorphotographer.com/tips-techniques/sports-adventures/shooting-the-curl/
https://www.outdoorphotographer.com/tips-techniques/sports-adventures/shooting-the-curl/#commentsTue, 29 Jul 2014 00:00:00 +0000http://www.outdoorphotographer.com/how-to/%how-to-category%/shooting-the-curl/Like many aspiring wave photographers, Moniz started shooting with a GoPro camera.
The perpetual motion of waves falling on the shores of lakes and oceans around the world gives you an opportunity to explore abstract shapes and colors while experimenting with composition and form. The reflective qualities of water are exceptional for capturing repetition in the colors and shapes of the surroundings and atmosphere. At the same time, the leading lines of concentrically closing waves often create a dynamic natural frame for wildlife, surfers, landscapes, coastal subjects and sunsets or sunrises.
Not many people can claim "rock star" as their fallback career, but when Hawaiian native Stan Moniz left for the mainland in 2000 to spend a decade touring with his band National Product, the self-proclaimed "water baby" was forced to set aside his photographic aspirations and leave the ocean behind. Prior to signing with a major label, Moniz was an amateur photographer and a professional bodyboarder—a natural choice for a kid who spent all his free time in the surf. So when his band called it quits in 2010, Moniz was free to make his way back to the beach—this time in California—and refocus his creative energy on the water.
Like many aspiring wave photographers, Moniz started shooting with a GoPro camera. Unlike most, though, he quickly found the versatility and image quality lagging behind his rapidly improving skill set. He upgraded to a Sony NEX-5N and considered it a revelation, even though he was using a makeshift waterproof housing found on eBay. When the budding photographer was introduced to Alan Love, owner of housing maker AquaTech, it changed his life.
"Right before the Nikon D7100 came out," Moniz says, "Alan said, 'Get the camera, and we'll get you a housing.' I shoot with a Nikon D7100 now, and my housing is an AquaTech Compac. The NEX-5N was awesome, but just having a camera with a larger sensor and no optical low-pass filter, the color spectrum was off the chain! So much more life in color and vibrancy. The images seemed more true to the moment. That change helped me grow and develop into the type of photographer I am today."
Love introduced Moniz to Greg Napoli from Kenko Tokina USA, who was so impressed with the photographer's energy that he offered to loan him any lens he wanted. While many of his colleagues rely on fish-eyes, Moniz made a calculated choice to set his work apart.
"Everyone shoots with the fish-eye," he says, "but I wanted to be different, so I got the 11-16mm. I stayed away from that fish-eye look specifically to force myself to create something new that not many are going after."
Up for a challenge, Moniz also uses a telephoto in the surf, the Tokina AT-X M100 macro. He uses it to isolate the beautiful details of curling waves and for the depth created with a soft background.
"I like being different," Moniz says, "and doing different stuff. Over the last year, I've started using the 100mm macro. Once I got it, I was, like, holy moly. It's an old lens, but I love it. I like the super-soft bokeh background, so I'll go down to ƒ/2.8 if I can. In the morning, I'll start at 1/1600th at ISO 100, and that will give me ƒ/2.8. I like that look, the pop. It looks really three-dimensional. There's so much texture to the background, it looks like patterns. It looks like you can touch it. It looks painted.
Photographer and bodyboarder Stan Moniz has made a career in and around water. He avoids the typical fish-eye look in favor of a more standard wide-angle view to incorporate more of the environmental surroundings. He also uses a telephoto macro lens to challenge himself compositionally.
"With the 100mm, I'm in autofocus," he notes. "This is the cool thing about the Compac housing: It has a pistol grip with two buttons. The top button is an autofocus track button. I'll always put my focus point a little off to the right. I never center anything; it's a Rule of Thirds kind of deal. So I track the wave on the top, so it locks it, and then I start firing with the bottom button. My camera shoots six frames per second. With the 100mm lens, there's more technique, but the photos are just remarkable."
Moniz says his two favorite lenses require distinctly different shooting techniques. "With the 11-16mm," Moniz explains, "you have to have a housing with a flat port because a dome port has distortion. I put the 11-16mm in manual focus, measure three feet and lock it. That's basically the sweet spot for water photography. With a wide-angle, you don't want anything below ƒ/5.6 because it's just too soft. I always stay between ƒ/7.1 and ƒ/11. That's my sweet spot. I'll never go over 1/1200th shutter speed. You don't even need to go over 1/1000th; that stops the wave enough. I usually shoot between 200 and 400 ISO to keep my aperture between ƒ/7.1 and ƒ/11, and I'm always in shutter priority. The other secret that a lot of people don't know is exposure compensation. A lot of people don't like shooting into the sun at sunrise because it gets blown out. I tell these guys to drop their exposure compensation by two-thirds. That boosts your aperture. And if you overexpose, that's going to bring your aperture down. Even on foggy days, I'm always at two-thirds."
Because rich color is so important, Moniz frequently uses a Speedlight in an AquaTech Strike housing to drop the ambient exposure and deepen the intensity of sunrise and sunset color.
"You kind of get burned out shooting with the same kind of lens in broad daylight," Moniz says. "Every wave is different, and I want to get more different. Like the 'Lime Wedge,' that was shot during a beautiful sunrise, but I used the SB-900 Speedlight. A lot of people will high-power everything, but that's not the trick. You've got to down it two-thirds or even a full stop. You're gonna kill the ambient light if you're too high. I've kind of got that down now, and my camera syncs at 1/320th, but I can go up to 1/1000th or even higher because it's a Speedlight. I use the rear sync, too, and it's stopping everything. I'll play with the exposure because I have it on TTL. I'll play with the exposure as the sun gradually comes up because I want the sunrise and sunset colors to be really pronounced and saturated. I don't like to do too much post. Before, I used to do way more post than I'm doing now. I think it's just because I know my settings now."
Back on dry land, Moniz runs his RAW images through a fairly straightforward postprocessing routine. While his images are saturated and detailed, he's careful to retain the reality of the waves and light.
"I used to be so crazy with the GoPro," he says. "You'd have to do all these different layers to mask the bad resolution and stuff. But in post now, basically I'll go to Curves and increase contrast and play with it from there. There's an S curve in there, that's one of the best ones. And then I'll go to Vibrance, especially on a gloomy day. I won't overdo it. When you can tell it's looking fake, that's when you pull it back. I won't go past 20 or 25 with the Vibrance unless it's a really dark day. And I keep the Saturation at 0.
"With the 11-16mm, you still sometimes get soft focus," Moniz adds, "so I'll duplicate the layer and do a High Pass filter. I'll set it at a Radius of about 3.0, and then I'll switch the layer mode to Overlay and bring the opacity down, probably never over 50%. That brings out insane detail. But sometimes it can look too fake. Sometimes people like that surreal look. I like it more real. It's very easy to cross that boundary."
See more of Stan Moniz's dynamic wave photography at www.stanmoniz.com.
]]>https://www.outdoorphotographer.com/tips-techniques/sports-adventures/shooting-the-curl/feed/7The Underwater Landscape
https://www.outdoorphotographer.com/tips-techniques/sports-adventures/the-underwater-landscape/
https://www.outdoorphotographer.com/tips-techniques/sports-adventures/the-underwater-landscape/#commentsTue, 13 May 2014 00:00:00 +0000http://www.outdoorphotographer.com/how-to/%how-to-category%/the-underwater-landscape/Underwater photography may be the most specialized form of nature photography there is.
All of the photos shown in this article were taken in the Banda Sea in Indonesia on a Wetpixel expedition. For 12 days, a small group of photographers lived aboard the Damai II dive boat as we moved from Ambon to Kaimana on the island of Papua. Above: The underwater landscape has an alien look about it. The sun ball is along the curved edge of a phenomenon called Snell's Window.
Underwater photography may be the most specialized form of nature photography there is. It's gear-intensive, you're working in an environment where humans aren't supposed to be able to survive, and it requires being closer to the subject than anything on land other than macro work. Like many people, I was drawn to underwater photography by my love of the ocean and an attraction to the incredible colors in underwater photos I had seen. In 2006, thanks to PADI, I had an opportunity to become a certified scuba diver and to take the PADI Digital Underwater Photography course. That experience changed my life.
Some of the dive sites were teeming with more fish than I've ever seen at a time before or since.
More than any other aspect of nature photography, digital cameras have enabled would-be underwater shooters to shorten the basic learning curve. Within a week of taking my first underwater photo (which essentially was an underexposed, blurry gray-green mess), I was shooting sharp, well-exposed, colorful and rewarding images. That's extraordinary. I had the technical basics sorted out, which freed me to embark on the much more rewarding adventure of looking for compelling images, watching animal behavior and finding underwater scenics.
Clear, shallow water gives you an opportunity to show dry land in the background.
Underwater photography is still highly specialized and gear-intensive, but it has become dramatically more accessible over the past decade. The ability to shoot, review on the LCD, adjust and shoot again has revolutionized the learning process.
Fundamentals Of Underwater Shooting Get Close. More than any other form of nature photography, it's important to get close to the subject when you're shooting underwater. It's a challenge, to be sure. You're dealing with surge and current, and you're trying not to touch anything—and this is all while controlling your breathing and paying attention to the fact that you're underwater! With all of that to think about, getting close isn't easy, but it's essential to making compelling photos.
Suggested Resources
Wetpixel.com is an outstanding resource for anyone interested in underwater photography. The community there is extremely knowledgeable and helpful. DivePhotoGuide.com is another excellent knowledge source. The best how-to book I've seen on underwater photography is The Underwater Photographer by Martin Edge.
Getting close presents some special challenges, particularly when it comes to lens selection. Because of the phenomenon of the virtual image, to render a sharp photo, you need to be using a lens that can focus close or you need to use a diopter. Interchangeable-lens cameras are housed in watertight (hopefully!) housings with interchangeable lens ports. Most underwater scenics are photographed with very wide-angle lenses with dome ports. It's because of the optical characteristics of the system and working in water that we have to deal with the virtual image. Your car mirror says objects are closer than they appear. When you're shooting with a dome port, the opposite happens. Objects seen through the dome port are farther than they appear. That's the virtual image. Also, the virtual image is considerably smaller than the actual subject. (The reason we use a dome port is because using a flat port with wider angles results in chromatic aberrations and sharpness issues, especially at the corners and edges of the frame. A dome port is a necessary evil.) The term "virtual image" can create confusion because it makes it seem as though it's a trick being played on your eyes. As far as your lens is concerned, however, there's nothing virtual about it. If the lens can't focus as close as the virtual image appears, the image won't be sharp.
Shoot Up. Following this advice will make the single biggest improvement in your images, and it really is that simple. Just shoot at an upward angle. This helps you to emphasize the subject, reduce clutter and distractions in the background and, depending upon the angle, it gives your photos some perspective by showing the surface.
Light It. Underwater lighting equipment is heavy, bulky, finicky to use and expensive. It's also incredibly important, especially when you drop below about 10 feet. Large strobes used to be the norm for underwater shooters, but today there are interesting options with continuous lights. And, of course, for shooting motion, continuous lights are a necessity.
The X Factor. Like all nature photography, there's an X factor in underwater images: understanding what you're seeing. Beyond the tips I mentioned, the best thing you can do to create special photos is learn about what you're photographing. A few of my favorite underwater photographers are Alex Mustard, Douglas Seifert and Tony Wu. They're extremely knowledgeable about the underwater environment and it shows in their images. Mustard is a marine biologist with a PhD who resides in the UK. Spend some time looking at his photos (amustard.com), and you'll see that X factor. Armed with the right gear and enthusiasm for making beautiful underwater photos, spend some time and effort studying and observing the environment and the interactions—you'll find your photos will improve in lock step.
Left: Coral structures always make for attractive and colorful images. Shooting at an upward angle keeps the background uncluttered. Right: The purple mantle of this balled-up anemone with its resident clownfish stuck outside is a relatively rare sight. All images: Canon EOS 7D, Sea&Sea MDX-7D housing, Tokina AT-X 107 DX 10-17mm fisheye lens
My Gear In landscape photography, everyone has their favorite lenses. Because of the peculiar requirements and challenges of shooting underwater, many photographers tend to gravitate to a confined collection of glass. For photographers shooting with APS-C cameras, the Tokina AT-X 107 DX 10-17mm fisheye has been a mainstay, and it's the lens I use on my Canon EOS 7D when I'm shooting wide angle. The Tokina's minimum focus distance of 6 inches makes it ideal for shooting with both a large dome port or a mini-dome.
When I'm shooting with my Canon EOS 5D Mark III, I use a Canon EF 8-15mm ƒ/4L Fisheye USM lens for most of my wide-angle work. I have a zoom gear for the lens, but more often than not, I just keep it at 15mm. The Sigma 15mm ƒ/2.8 EX DG Diagonal Fisheye is another popular lens for full-frame underwater work.
Sea&Sea YS-250 TTL Strobe
For macro, I use a Sigma Macro 50mm ƒ/2.8 EX DG or a Canon EF 100mm ƒ/2.8 Macro IS USM on both the 7D and 5D Mark III. I find the 100mm is difficult to use if there's surge or current because of the longer focal length and narrower field of view.
My 7D is housed in a Sea&Sea MDX-7D aluminum housing. The 5D Mark III is in a Seacam Silver 5D Mark III aluminum housing. I have flat ports, as well as 8-inch dome ports and 4-inch mini-domes for both housings.
I use Sea&Sea YS-250 TTL strobes. They're large and heavy, but they pack a lot of power, and I like the rechargeable battery packs they use. When I'm shooting video with either DSLR, I use a pair of Light & Motion Sola 4000 lights or Sola 2000s, depending on the situation. The Sola 4000s have a lot of power, but they're also large and heavy.
Sea&Sea MDX-7D; Seacam Silver 5D Mark III ; Light & Motion Sola 4000
]]>https://www.outdoorphotographer.com/tips-techniques/sports-adventures/the-underwater-landscape/feed/4Surf Alaska
https://www.outdoorphotographer.com/tips-techniques/sports-adventures/surf-alaska/
https://www.outdoorphotographer.com/tips-techniques/sports-adventures/surf-alaska/#respondMon, 14 Oct 2013 00:00:00 +0000http://www.outdoorphotographer.com/locations/%locations-category%/surf-alaska/Self-taught photographer Chris Burkard calls the ocean his muse.
Self-taught photographer Chris Burkard calls the ocean his muse. As a senior staff photographer for Surfer Magazine and a project photographer for Patagonia, Burkard has traversed the globe photographing waves, wind and water, and the people who live to work and play with those elements. In May of 2013, Burkard had the chance to visit Alaska, traveling with a small group of surfers by boat, as they explored the Kenai Peninsula for interesting and unfamiliar surf areas. We caught up with Burkard, who filled us in on that experience, his technique and how he kept his gear ready to go while working in that remote location.
Outdoor Photographer: Alaska is hardly the typical location many people think of when they think of surfing. Can you tell us how you got these photos?
Chris Burkard: We did a boat trip there to search for waves throughout the Kenai Peninsula. In Alaska, you're always looking for opportunities where the weather and the swell are not too harsh. The conditions have to be calm enough to let you in. So for us, it was a matter of going to Alaska in May to get the tail end of the northwest swells that were coming through. We went on a boat called the Milo that's anchored in Palmer, so we went from there with a captain and a crew, and myself and three surfers. We scoured the Kenai Peninsula looking for little nooks and crannies along the coast, searching for inlets or spots where swells might condense and then create interesting waves, whether it's a reef or a point break. And (we) got several days of shooting, but when the weather started to deteriorate, we had to call it and come in.
OP: What areas were you in specifically?
CB: Basically we started in Palmer, and went around the Kenai Peninsula searching the coast. As far as the spots we showed up at, it was basically wherever the waves looked best. Some of the spots were on maps, some of them weren't. Some of them were open. Some of the beaches you couldn't access any other way than from the water. We'd have to get in dry suits, and get on surfboards and paddle to the beach, and punch the shore break and sort of walk around and explore.
OP: Was the experience gritty or…
CB: It was about as gritty as it gets. Luckily, when we were there, the weather was really nice, but I remember one time loading up and getting into my dry suit, and I had a backpack with $30,000 of camera gear in it, and I was jumping on a surfboard paddling in. There were eight-foot waves, and I was getting hit hard, and hoping nothing was broken and everything was staying dry. When I was going back to the boat, which was about a half mile out from the beach, I remember right as I paddled through the shore break—which is brutal on its own because the dry suit was full of air, which makes it really hard to swim—I saw two orca fins. So, I was just paddling right towards them and hoping they didn't notice me. That was a little hectic.
OP: What were the shooting techniques that you used?
CB: I didn't shoot in the water during the trip. I just had to paddle through the water to get to land. When I was there, I was mainly using telephoto lenses to compress the landscape in the background with the foreground. I really wanted to show the surfers in context. I wanted to give them a sense of place. So, whether it was a big snowy peak in the background or whether it was an icy glacier or just trees or something like that, I really wanted to shoot in a way that showed the landscape and created the sense of place.
OP: What did you use in terms of your gear?
CB: I use Nikon. I had Nikon D7100 and a D300s, as well as the 80-400. Typically, when I'm shooting on a trip, I bring a Nikon 600 or a 200-400, but I needed something light and a kit that I could bring to the beach in these conditions in a pack with all of my gear. The 80-400 was crucial for this trip. I also travel with a Sony NEX kit, always. It gives me something for lifestyle moments, and it's a small camera that I can pull out and use all the time.
OP: I understand that you also used GOAL ZERO solar gear on this trip?
CB: Yes. They're a sponsor of mine. Basically, any trip I do, I'm off the grid. Ninety percent of the time we're camping or on boats, so for me, to charge equipment and gear, I have to roll out a solar panel and bring out a Sherpa 150, which works as a full power converter to charge a laptop, other equipment…pretty much everything. And so for me, it's crucial to keep gear charged, so I can edit and back up images, and make sure my batteries are working, and generally just have everything powered up. So in Alaska, every time I paddled to the beach, I would bring the Goal Zero Sherpa 150, as well. I would just set it up while the sun was there. The only hard part was that in Alaska the sun is pretty limited, so I was using every second of it.